


ķ
3
POWER
STORE/CLEAR
EDIT/COPY
TUNING
DSR/FM
ATS
POWER
STORE/CLEAR
EDIT/COPY
TUNING
DSR/FM
ATS
POWER
STORE/CLEAR
EDIT/COPY
TUNING
DSR/FM
ATS
POWER
STORE/CLEAR
EDIT/COPY
TUNING
DSR/FM
ATS
+40
+5
0
POWER
STORE/CLEAR
EDIT/COPY
TUNING
DSR/FM
ATS
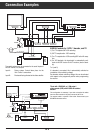
10 cm
This satellite receiver is intended for reception of picture and
sound signals. Any other application is expressly prohibited.
Make absolutely sure that your receiver is not exposed to drip-
ping or splashing water. Protect the receiver from moisture.
In addition, ensure that the ventilation openings are never
obstructed.
Do not place your receiver near sources of heat.
Heat build-up in the receiver is a source of danger and redu-
ces the receiver´s operating life.
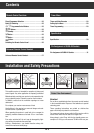
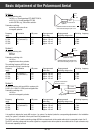
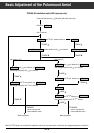
When operating the receiver in a wall unit (or in a camper, for
example), maintain distances of at least 10 cm – see illustra-
tion.
Even when switched off, the unit may be damaged by light-
ning striking the mains and/or aerial lead.
During a thunderstorm, you should therefore always dis-
connect the mains and aerial plugs.
Protect Your Environment!
Attention!
Do not throw used batteries from the remote control handset
in the household waste. Dispose of the batteries at a special
collecting point.
These operating instructions are printed on chlorine-free
paper which helps to protect the environment.
For reasons of ecology, always switch off the receiver with its
mains switch when it is not used for a longer time.
Always keep in mind: Even with the low standby power con-
sumption of 10 W, you will consume 70 kWh within one year.
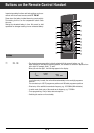
Remote Control Functions
Direct Programme Selection ................................. 26
Radio/TV Switching............................................ 26
]
|
Programme Select Buttons ....................... 26
xc
Buttons................................................. 26
b
Standby ..................................................... 26
¢
TV
Button ....................................................... 26
.
Button ....................................................... 26
O
Button ...................................................... 26
Switching the Remote Control Level ........................ 26
Universal Remote Control Handset
Universal Remote Control Handset.......................... 27
Timer Menu
Timer and Video Recorder ................................... 28
Calling Up the Menu........................................... 28
Timer Programming ........................................... 28
Specification
Specification.................................................... 30
Pin Assignment of EURO-AV Sockets
Pin Assignment of EURO-AV Sockets ....................... 31
Installation and Safety Precautions
Contents