


02
28
En
When mounting on a rack
Be sure to use the included rack mount brackets. Using
anything else could damage this unit or result in injury.
For details on mounting, see below.
• This unit has a rack mount size of 1U.
• The included rack mount brackets can be used to
mount this unit onto an EIA 19-inch universal pitch or
wide pitch rack.
Cautions on moving this unit
Moving this unit with an SD memory card inside could
damage it. Stop data access to the SD memory card then
eject the SD memory card before moving this unit. Also,
press the STANDBY/ON button, check that the
indicator switches from green to orange, then unplug the
power cord. Unplugging the power cord before the
indicator switches to orange could destroy the data on
the SD memory card or restore this unit’s settings to their
factory defaults.
•The STANDBY/ON indicator may remain lit for
several dozen seconds after the power cord is
unplugged. This is not a malfunction. Make sure the
STANDBY/ON indicator has turned off before
moving this unit.
Transporting this unit
When transporting this unit, be sure not to subject it to
vibrations or shocks or to drop it. Do not let this unit be
exposed to heat or water during transportation.
Be sure to remove any SD memory card before
transporting this unit. Transporting this unit with an SD
memory card in it could cause internal damage to this
unit. Also, disconnect cables. Transporting with cables
connected could damage the terminals.
Condensation
If this unit is moved suddenly from a cold place into a
warm room (in winter, for example) or if the temperature
in the room in which this unit is installed rises suddenly
due to a heater, etc., water droplets (condensation) may
form inside. When condensation is present, this unit will
not operate properly and playback is not possible. Let this
unit stand at room temperature for one or two hours with
the power turned on (the time depends on the extent of
condensation). When this unit is kept at room
temperature, the water droplets will dissipate and
playback will become possible.
Condensation can also occur in the summer if this unit is
exposed to the direct wind from an air-conditioner. If this
happens, move this unit to a different place.
Cleaning this unit
Normally, wipe this unit clean with a soft cloth. For tough
dirt, apply some neutral detergent diluted in five to six
parts water to a soft cloth, wring out thoroughly, wipe off
the dirt, then wipe again with a dry cloth.
Note that getting alcohol, thinner, benzene or insecticide
on this unit could cause the print and coating to peel off.
Also, avoid leaving rubber or vinyl products in contact
with this unit for long periods of time, as this could
damage the cabinet.
When using chemical-impregnated wipes, etc., read the
wipe’s cautions carefully.
Unplug the power cord from the power outlet when
cleaning this unit.
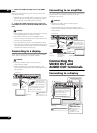
Mounting on a rack
Caution
• The rack mount brackets included with this unit allow
this unit to be mounted on universal pitch or wide
pitch racks conforming to EIA 19-inch standards.
• The included rack mount brackets are exclusively for
use with this unit. Never mount them on other devices
or use them for other purposes; doing so is
dangerous. Note that Pioneer will accept no
responsibility whatsoever for any damages due to use
of the rack mount brackets for other purposes, nor for
any loss of business opportunities or other damages
due to installation of this unit.
• Check that the rack has the appropriate strength for
this unit’s weight and usage environment before
mounting.
• The screws for fixing the rack mount brackets to the
rack (indicated as * in page 29) are not included.
Choose screws with the appropriate strength and
length for this unit’s weight and usage environment
to mount this unit on the rack. To ensure that this unit
is fixed securely on the rack, be sure to fasten it with
screws in all four rack mount screw holes.
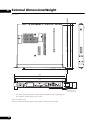
• For the positions of the rack mount brackets’
mounting screw holes, see page 30.
• The mounting procedure should be performed by at
least two people.
• When mounting, be extremely careful not to get your
fingers, etc., caught between the rack mount
brackets and the rack.
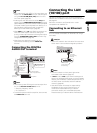
1 Disconnect all cords connected to this unit
(including the power cord).
Before starting, make sure there is no SD memory card in
this unit.
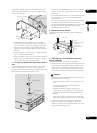
2 Mount the rack mount brackets.
Caution
• Be sure to use the included screws when mounting
the rack mount brackets. Using any other screws
could damage this unit or cause it to fall.