


29
En
02
English
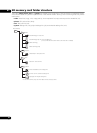
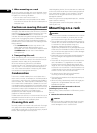
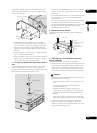
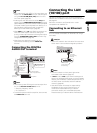
Attach the included rack mount brackets to the screw
holes in the side of this unit using the included screws,
four screws per side.
• When attaching, first tighten the four included
screws temporarily so that the rack mount bracket
still moves when a light force is applied, check that
the rack mount bracket is properly attached, then
tighten the screws to fasten the rack mount bracket
securely.
• If the rack space in which this unit is to be installed is
only 1U size, proceed to step 3.
• If the rack space in which this unit is to be installed is
greater than 1U size and there is space of more than
10 mm under this unit, proceed to step 4.
3 Turn this unit upside-down and remove the four
feet.
Use a flat-blade screwdriver to turn the “–” part of the
plastic screw section on the foot counterclockwise,
loosen until the plastic screw section’s head comes out of
the foot, then remove the foot from this unit.
• The feet will be needed again if this unit is installed
without using a rack, so be sure to store them in a
safe place.
• To reinstall the feet on this unit, insert the foot into the
foot fixing hole in this unit, then press the plastic
screw section in.
• Do not mount anything other than the feet that were
removed (including the plastic screw section).
Mounting other feet may damage this unit. If you lose
the feet, contact the after-sales service center
(indicated on the rear panel).
4 Mount this unit on the rack.
Check that the screws fastened in step 2 are securely
tightened.
5 Check that the screws fastened in step 4 are
securely tightened.
Once this is checked, mounting is completed.
• If the * screws or the rack mount bracket’s screws are
loose, vibrations generated by other products could
cause noise or to lead this unit falling off the rack,
resulting in injury or damage to the equipment. Be
sure to check that the screws are securely fastened.
Caution
• Pay attention to the following when removing this unit
from the rack and moving it:
– Be sure to remove any SD memory card from this
unit.
– Turn this unit’s power off, then disconnect
connected cables, etc.
– Be careful that this unit does not fall when
loosening the screws fastening it to the rack (the
procedure should be performed by at least two
people).
– After removing this unit from the rack, be sure to
place it on a stable surface, such as on a flat table.
• When wiring after installing this unit, fasten the
cables to the rack. If your feet get caught in the
cables, a strong force could be exerted on this unit’s
terminals, damaging this unit.
Rack mount bracket
Included
screws
Screw holes in side
Plastic screw
Remove foot
Foot fixing
hole
This unit
Rack
(Conforming to EIA
standards)
Rack mount
mounting screw
holes
Screws (*)
Rack mount
brackets
Screws (*)