


43
En
05
English
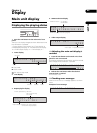
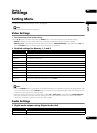
Switching the
resolution
Use the procedure below to switch the resolution of the
video signals output from COMPONENT VIDEO OUT
terminal, HDMI OUT terminal.
Caution
• With some devices (TVs, AV amplifiers, etc.), the
picture or sound may not be output properly if the
resolution is switched. If this happens, use the
OUTPUT RESOLUTION (+, –) buttons to set a
resolution at which the picture or sound is output
properly.
• When outputting with a resolution of 1920 x 1080p,
1920 x 1080i or 1280 x 720p from the HDMI OUT or
COMPONENT VIDEO OUT terminals, the signals
may be output with a ratio of 16:9, even when TV
Screen is set to 4:3 (page 46).
• The picture may not be displayed for several seconds
when the resolution is switched.
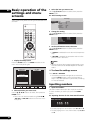
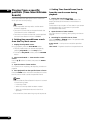
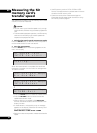
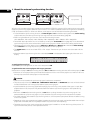
1 Press one of the OUTPUT RESOLUTION (+, –)
buttons.
The resolution switches each time the button is pressed.
• The current resolution setting can be checked on the
main unit display. Press the LCD button on the main
unit’s front panel to switch the resolution display.
• The resolution can also be switched at Scaler Setting
(page 46).
Displaying the
firmware version and
serial number
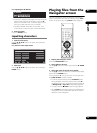
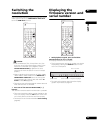
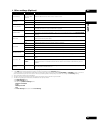
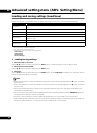
1 With playback stopped, press and hold the
DISPLAY button for over 1 second.
The display switches as shown below.
• The firmware version and serial number can also be
displayed by pressing the DISPLAY button on the
main unit’s front panel.
• To check on the display, see Information display
(System Information) on page 52.
SEARCH
FRM
/TIME
REPEAT MEMORY RECALL
DISPLAY
PLAY
MODE
NAVI-
GATOR
SETUP RETURN
OUTPUT
RESOLUTION
+
-
STANDBY/ON
SEARCH
FRM
/TIME
REPEAT MEMORY RECALL
DISPLAY
PLAY
MODE
NAVI-
GATOR
SETUP RETURN
OUTPUT
RESOLUTION
+
-
STANDBY/ON
+
-
Ver. 01. 00
SN. JATW01234 5J P
Version number
Serial number Serial number – 12 digits are displayed