


SMD101 Power Up Procedure
NOTE: Before powering on the SMD101, ensure that all necessary devices are
connected properly. Devices do not need to be powered.
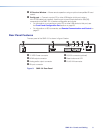
Connect the external power supply to a 100 to 240 VAC supply (see Rear Panel Features
on page9). The DC power LED lights and the SMD101 undergoes a self testing
sequence. When connected to a network, the front panel network LED indicator lights green
when the SMD101 is ready to decode.
Hardware Setup Overview
NOTE: If it is difficult to access the device after installation, configure the network
settings of the SMD101 prior to starting (see Accessing the Web-based User
Interface on page14 , and Connection on page34).
1. If the SMD101 has been on for configuration, turn it off and disconnect the SMD101
and all connected devices.
2. Mount the SMD101 (see Mounting the SMD101 on page81).
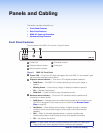
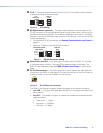
3. Connect one end of an RJ-45 cable to the rear panel LAN connector on the SMD101
(see Rear Panel Features on page9). Connect the other end of the RJ-45 cable
to the local network.
4. Connect a compatible output device to the rear panel (see Rear Panel Features on
page9) and power it on.
5. Connect a control device to the SMD101 by one of the following connections:
a. The front panel config port (see Front Panel Configuration Port on page58).
b. The rear panel RS-232 port (see RS-232 Port on page57).
c. The Ethernet connection. Configure the network settings of the control PC so it is
compatible with the network the SMD101 is connected to (see LAN (Ethernet)
Port on page59).
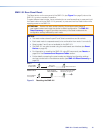
6. Connect the external power supply output connector to the SMD101 (see Rear Panel
Features on page9), then connect the power supply to a 100 to 240 VAC, 50 Hz
or 60 Hz power source. The SMD101 powers up automatically and undergoes a self
testing sequence (see the SMD101 Power Up Procedure, above).
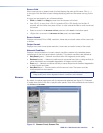
7. From the control PC, access the user interface of the SMD101 (see Accessing the
Web-based User Interface on page14).
8. Select a stream to decode (see Player Page on page16).
9. If necessary, set the decoder output for the connected display (see Video Output on
page3 and Video Configuration on page28).
10. Press Play on the software interface (see Player Page on page16) or on the
optional remote control (see IR Remote Control on page56) to begin decoding the
selected stream.
SMD101 • Panels and Cabling 13