


12
Controls and Their Functions (continued)
13
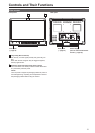
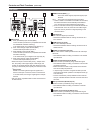
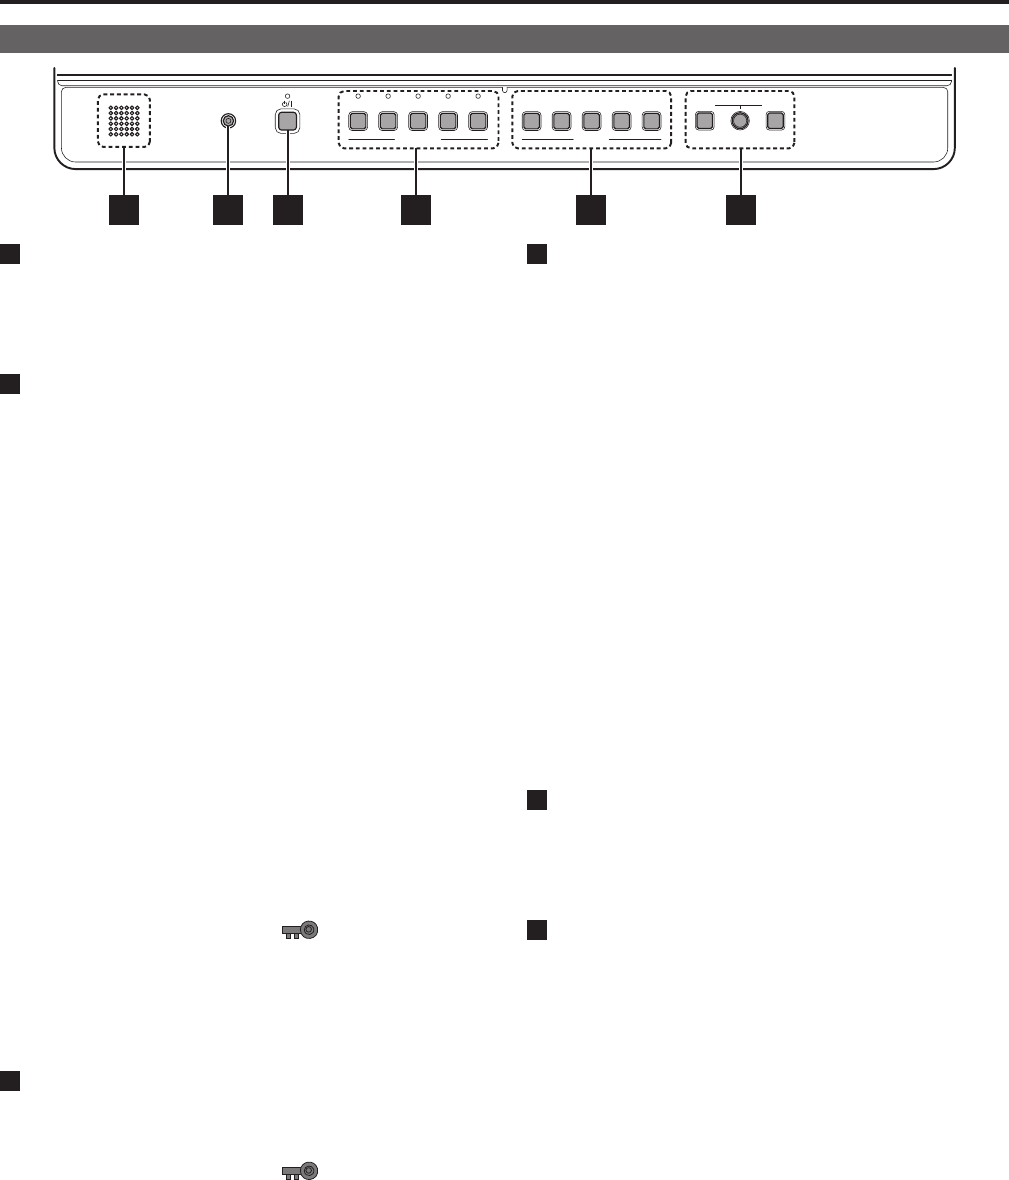
Front panel
HEADPHONES
VIDEO
SDI 1 SDI 2 HDMI DVI-I
INPUT SELECT
VOLUMEPICTURE
MENU RETURN
1 2
FUNCTION
3 4 5
5 16 2 3 4
1
POWER <8> switch
Switches the power supply ON/OFF. When the power is on,
the LED (green) lights.
To turn the power off, press and hold the switch for at least
three seconds.
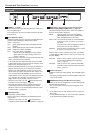
2
INPUT SELECT buttons
Selects the signal input line. The green LED light above the
pressed button indicates the selected input signal.
VIDEO : Video input
SDI1 : Serial digital interface input (compatible with 3G/
HD/SD)
SDI2 : Serial digital interface input (HD/SD compatible)
HDMI : HDMI input (HDCP compatible)
DVI-I : DVI-I input (HDCP compatible)
• Selects one of the following four input signals:
digital video or PC signal, analog video or PC
signal.(→page 44)
• When the power is turned on, the input line used when the
power was last turned off is selected.
• In 3D assist and TWO WINDOW mode, the input is fixed
to SDI1/SDI2 and the input line cannot be changed. (Then
both the SDI1 and SDI2 LEDs go on.)
• Switching the [2D/3D ASSIST] menu from [3D ASSIST] to
[2D] will return the input line to the previous 2D setting.
• Switching the TWO WINDOW function from ON to OFF
will return the input line to the previous OFF setting. How-
ever, turning on the SUB WINDOW function or the PIC-
TURE ASSIST function when the TWO WINDOW function
is on, activates SDI1 operation, and when the 2-screen
display function is off, the SDI1 input line is used.
• When the control lock is on, the
mark appears and
input lines cannot be changed.(→page 48)
• When INT-SG (internal chart for adjustment [Color Bar
+ Grayscale]) is selected, all LEDs above the <INPUT
SELECT> button are off. Use the [INPUT SELECT] menu
to select INT-SG. (→page 20)
3
FUNCTION button
FUNCTION1 to FUNCTION5:
Press to use function assigned to the FUNCTION button
using a menu.
• When the control lock is on, the
mark appears to
indicate that FUNCTION operation is disabled.(→page 48)
4
MENU button, rotary knob (with push-on switch (PIC-
TURE) and RETURN/VOLUME button (→page 16)
Use these buttons to display menus, select and adjust set-
tings and perform menu selections.
MENU: Press to display or exit the [TOP MENU]
([MAIN MENU] (main menu), [FUNCTION]
menu and [INPUT SELECT] menu).
Rotary knob: Turn the knob clockwise or counterclockwise
to move the cursor up or down or to change
set values.
Press the knob to start changing set values, to
confirm them and to open submenus.
RETURN: Press to return to the previous menu or cancel
to recover a previously set value.
When no menu is open, press the rotary knob <PICTURE>
or <RETURN/VOLUME> button to open a menu other than
the [TOP MENU].
PICTURE: When no menu is open, press the rotary knob
to open the [PICTURE] (picture adjusting)
menu.(→page 17)
VOLUME :
When no menu is open, press the <RETURN/
VOLUME> button to open the audio volume bar
meter.(→page 17)
5
Speaker (monaural)
*
1
Enables monitoring of analog AUDIO, SDI and HDMI signal
inputs.
• Connecting headphones to the HEADPHONES output jack
turns off the speaker.
6
HEADPHONES output jack (M3 stereo mini jack)
*
1
Allows you to connect headphones to monitor analog audio,
SDI and HDMI signal inputs.
• The sound volume and sound quality will depend on the
headphones.
*
1
• In 3D assist mode, you can monitor the left (L) channel of
SDI1 audio.
• In TWO WINDOW mode, you can monitor SDI1 and SDI2
audio selected using [AUDIO OUT SEL.].