


20 21
How to Use the On Screen Menu (continued)
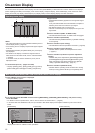
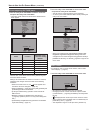
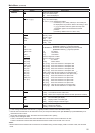
Picture adjusting (PICTURE) menu
1.
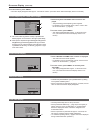
Turn the rotary knob <PICTURE> to select a menu item
and press the rotary knob <PICTURE>.
• The menu closes and the set values of the selected menu
items appear.
[PHASE] 30
[PICTURE]
SETTING[FACTORY]
PEAKING
PHASE
CHROMA
BRIGHT
CONTRAST
BACKLIGHT
F-IN-R
0
30
30
30
50
80
15
MENUEXIT
MENUEXIT
RETURN
RETURN
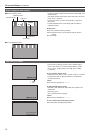
Name Function
Adjustable range
( ): denotes factory
defaults.
PEAKING PEAKING 0 to 30 (0)
PHASE PHASE 0 to 60 (30)
CHROMA CHROMA 0 to 60 (30)
BRIGHT BRIGHT 0 to 60 (30)
CONTRAST CONTRAST 0 to 60 (50)
BACKLIGHT BACKLIGHT 0 to 100 (80)
F-IN-R FOCUS-IN-RED 1 to 30 (15)
The text color of set values that are factory defaults is green
and other values are white.
Settings are loaded when the monitor is turned on. However,
operations and changes cannot be made in the following
conditions.
• When the control lock is on, the
mark appears and
set values cannot be changed. (→page 48)
• When the [MONO] (→page 28) is set to [ON], [PHASE] and
[CHROMA] operations are disabled.
• [F-IN-R] is enabled during operation of the FOCUS-IN-
RED function.
• [BRIGHT] operation is disabled during [HV DELAY]
(→page 34) operation (when it is in any other setting than
OFF).
• [CONTRAST] and [BACKLIGHT] operations are disabled
in [BLACK MODE] (→page 34).
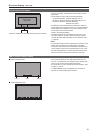
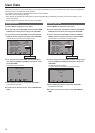
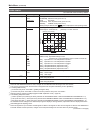
2. Turn the rotary knob <PICTURE> to select a set value
and press the rotary knob <PICTURE>.
• The set value is confirmed and the menu reappears.
• To cancel, press <RETURN/VOLUME> before pressing the
rotary knob <PICTURE>.
MENUEXIT
MENUEXIT
RETURN
RETURN
[PHASE] 20
[PICTURE]
SETTING[FACTORY]
PEAKING
PHASE
CHROMA
BRIGHT
CONTRAST
BACKLIGHT
F-IN-R
0
20
30
30
50
80
15
*
• When picture adjustments ([PEAKING]/[PHASE]/[CHRO-
MA]/[BRIGHT]/[CONTRAST]/[BACKLIGHT]) have been
changed from the values assigned using [SETUP LOAD] or
[POWER ON SETUP], an asterisk (
*
) appears to right of the
menu name.
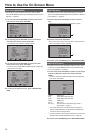
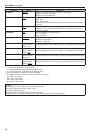
Audio volume
• For details on how to use the audio volume, refer to“Audio
volume display” (→page17).
1. Turn the rotary knob <PICTURE> to select a set value.
MENUEXIT
[VOLUME] 30
• Set values are confirmed when they are changed.
• Changing the audio volume when audio output is muted
(“AUDIO MUTE” (→page 35)) immediately cancels [AUDIO
MUTE].
•
is displayed when audio output of the monitor is muted.
• Audio volume is always available and is not affected by the
[CONTROL] menu (→page 48).
• The adjustment range is 0 to 60 (the factory default is 0)