


34
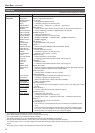
Main Menu (continued)
35
FUNCTION
Underlined values indicate factory defaults.
Submenu Setting Description
FUNCTION1 -
FUNCTION5
HV DELAY
BLUE ONLY
GAMMA SELECT
SD ASPECT
SCAN
SUB WINDOW
WFM/VECTOR
MARKER
WHITE BALANCE
PIXEL TO PIXEL
PIXEL POSITION
FOCUS-IN-RED
LEVEL METER
CROSS HATCH
MONO
BLACK MODE
TIME CODE
CLOSED CAPTION
AUDIO MUTE
AUDIO OUT SEL.
ANAMO
TWO WINDOW
Y MAP
PICTURE ASSIST
R COLOR
G COLOR
B COLOR
ZEBRA
ZEBRA LEVEL
2D/3D ASSIST
UNDEF
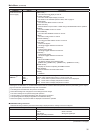
(Factory defaults
FUNCTION1:
WFM/VECTOR
FUNCTION2:
TWO WINDOW
FUNCTION3:
FOCUS-IN-RED
FUNCTION4:
TIME CODE
FUNCTION5:
LEVEL METER)
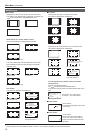
Selects functions to be assigned to <FUNCTION1> - <FUNCTION5> (front panel
buttons or the [FUNCTION] menu).
[HV DELAY]
*
1
This displays the blanking period.
The display changes in the following order.
[DELAY OFF] → [H DELAY] → [V DELAY] → [HV DELAY]
[BLUE ONLY]
*
1
Cuts the red and green signals. Use this function to check phase (PHASE) and
chroma (CHROMA). This button toggles between ON and OFF.
[GAMMA SELECT]
*
2
*
3
Displays the gamma curve.
The display changes in the following order.
[GAMMA STANDARD] → [GAMMA FILM] → [GAMMA STDIO/PST] →
[GAMMA CINEMA]
[SD ASPECT]
*
2
*
3
Switches between [16:9] and [4:3].
[SCAN]
*
2
*
3
Switches between [UNDER SCAN] and [NORMAL SCAN].
[SUB WINDOW]
*
1
Sets the split-screen function.
The display changes in the following order.
[SINGLE] → [FULL/PART] → [STILL]
[WFM/VECTOR]
*
2
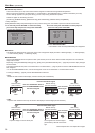
Displays waveform or vector display.
For details on the available operation items, refer to page 36.
[MARKER]
*
2
*
3
*
4
Display the marker.
For details on the available operation items, refer to page 36.
[WHITE BALANCE]
RGB can be directly adjusted under [GAIN]/[BIAS] in WHITE BALANCE only when
[VAR1] to [VAR3] are selected under [COLOR TEMP.].
[PIXEL TO PIXEL]
Turns the PIXEL TO PIXEL function On and Off.
[PIXEL POSITION]
Positions the display of signals when PIXEL TO PIXEL is on.
The display changes in the following order.
[PIXEL TO PIXEL LEFT]→[PIXEL TO PIXEL CENTER]→
[PIXEL TO PIXEL RIGHT]
[FOCUS-IN-RED]
*
3
*
5
Turns On/Off the function that highlights in red the portion of the image that is being
focused.
[LEVEL METER]
*
2
Turns the audio volume bar meter display On and Off.
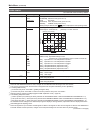
[CROSS HATCH]
*
2
Displays the cross hatch grid.
The display changes in the following order.
[CROSS HATCH OFF] → [CROSS HATCH LOW] → [CROSS HATCH HIGH]
[MONO]
*
2
*
3
Switches between color and monochrome.
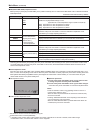
[BLACK MODE]
*
1
*
6
This mode is for correcting black level errors and checking the gradation of dark
areas.
The brightness of the backlight is reduced and the contrast is increased so that
up to 75 % of the input signal level has the same gamma curve as the [GAMMA
SELECT] setting. The signal level of 75% or higher is clipped.
*
1
The settings are canceled when the power is turned OFF.
*
2
When these settings are changed, the menu settings will also change.
*
3
The control settings do not operate during GPI operation.
*
4
Not displayed when [16:9], [4:3] and [
CENTER]
are all [OFF] in the [MARKER] menu settings.
*
5
During FOCUS-IN-RED operation, use the rotary knob <PICTURE> to change the detection sensitivity.
The setting range is from 1 to 30, with a higher numerical value resulting in higher detection sensitivity (the focus becomes less
sharp).
*
6
The bright picture is clipped. The back light and contrast cannot be adjusted.