


17
Initial auto installation
W
hen the TV is powered on for the first time after purchase,
the initial auto installation wizard appears. Follow the menus
and make the necessary settings one after another.
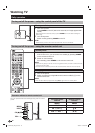
Confirm the following before turning on the
power
E
Is the antenna cable connected?
E
Is the AC cord plugged in?
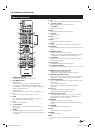
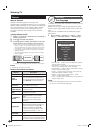
1 Press < on the TV.
• The initial auto installation wizard appears.
POWER
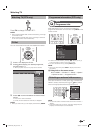
2 Setting the OSD language.
Press a/b/c/d to select the desired language, and then
press ?.
3 Selecting the location of the TV.
Press c/d to select where you will use this TV, and then
press ?.
HOME:
• Settings are optimised for normal home viewing and
energy efficiency.
• “STANDARD” will be the default value for the “AV mode”
setting.
STORE:
• Settings are designed for maximum impact in retail store
displays.
• “DYNAMIC (Fixed)” will be the default value for the “AV
mode” setting. If the “AV mode” is changed, the TV will
automatically switch back to “DYNAMIC (Fixed)” when
there is no operation using the TV or remote control unit
for 30 minutes.
• The confirmation screen pops up only when selecting
“STORE”. Press c/d to select “Yes” or “No”.
NOTE
• STORE: A demonstration image will be displayed after initial
auto installation is completed. If you have chosen “STORE”
by mistake, go to “Setup” > “View setting” > “Reset” > select
“HOME” again.
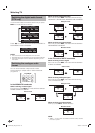
4 Setting the country.
Press a/b/c/d to select your country or area, and then
press ?.
• This setting screen only appears during the initial auto
installation.
NOTE
• DTV concerned menu may not displayed in some
country.
5 Press c/d to select “Digital Search” or “Analogue
Search”, and then press ?.
6 The TV searches for, sorts and stores all the
receivable TV stations according to their settings
and the connected antenna.
• To abort the initial auto installation in progress, press
C.
NOTE
• If you turn off the power on the TV while performing a channel
search in Step 5, the initial auto installation wizard may not
appear. The auto installation function allows you to execute
the installation again from “Setup” > “View setting” (Page 42).
• The initial auto installation wizard will abort if you leave the TV
unattended for 30 minutes before searching for channels in
Step 6.
• Selecting menu of “Digital Search” or “Analogue Search” may
not be displayed in some country.
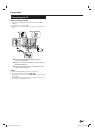
Checking signal strength and
channel strength (DTV only)
If you install a DTV antenna for the first time or relocate it,
you should adjust the alignment of the antenna to receive
a good reception while checking the antenna setup
screen.
1 Go to “HOME” > “TV Menu” > “Setup” > “View
setting” > “Channel settings” > “Antenna setup-
DIGITAL”.
E
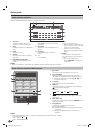
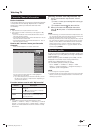
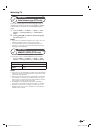
Checking signal strength
2 Press a/b to select “Signal strength”, and then
press ?.
Supply voltage
CH No.
Current Max.
Signal strength
Signal strength
Channel strength
Current Max.
Quality
97 97
99 99
E
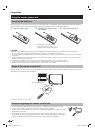
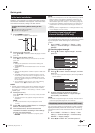
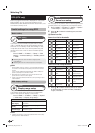
Checking channel strength
3 Press a/b to select “Channel strength”, and then
press ?.
• You can input a specified frequency band using the 0–9
numeric buttons.
Supply voltage
CH No.
Current Max.
Signal strength
MHz
Signal strength
Frequency
Channel strength
Current Max.
Quality
97 97
99 99
4 Position and align the antenna so that the
maximum possible values for “Signal strength”
and “Quality” are obtained.
NOTE
• The values of “Signal strength” and “Quality” indicate when to
check the appropriate alignment of the antenna.
Supplying power to the antenna (DTV only)
You can supply power to the antenna in order to receive
digitally/terrestrially broadcast stations after connecting
the antenna cable to the antenna terminal on the rear of
the TV.
1 Go to “HOME” > “TV Menu” > “Setup” > “View
setting” > “Channel settings” > “Antenna setup-
DIGITAL” > “Supply voltage”.
2 Press c/d to select “On”, and then press ?.
Quick guide
LC90LE760X_EN_book.indb 17LC90LE760X_EN_book.indb 17 4/4/2014 3:09:59 PM4/4/2014 3:09:59 PM