


33
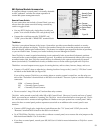
• If the numeric displays begin flashing at any time during the module scan, two or more
modules have the same address. Duplicate addresses are disallowed because the control
panel is unable to tell two identically addressed modules apart. Note the last group
number displayed in the Product Group windows and the module number displayed in
the EVC window and try to find two modules that both have this address. For example, if
the control panel is flashing, the EVC window displays 002, and the third Product Group
window shows S4, you would look for two speaker modules (932) with the same address
of “Group 4, Module 02, Right.” Remember that pairs of speaker modules must have the
same Group and Module ID address, but must be identified LEFT and RIGHT to avoid a
duplication (see page 18).
Note: In Control Panels, E refers to Electronics switching modules and S refers to Speaker switching modules.
• If the erroneous address stays in the windows too short a time to catch, press SECURE, 88,
SECURE to reboot the system and repeat the test.
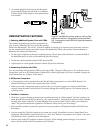
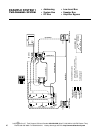
• As each new group number appears in a PG window (Product Group, Figure 39), the EVC
window counts up the number of modules in that group that can be recognized. Write
down the highest number reported in the EVC window and the Group number with it.
For each group, compare the reported module tally with a physical count of the modules.
For example, your system has four “E Group 0” modules, six “E Group 4” modules, and
three pairs of “S Group 4” modules. The top PG window displays “E0” as EVC scans up to
4 (good), the second PG window displays “E4” as EVC scans up to 5 (bad), and the third
PG window displays “S4” as EVC scans up to 3 (good). In this case you would look for a
mis-addressed, unplugged, or faulty E4 module (Electronics Group 4).
• If the module count in a group does not match the number of modules you actually have,
look for disconnected or mis-addressed modules. Also check for gaps in the series of
Module ID settings in that group. For example, 0, 1, 2, 4, 5 is not allowed and will be
reported as 3 modules; in this case, the modules addressed 4 and 5 must be corrected to 3
and 4, respectively.
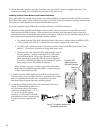
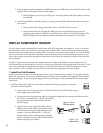
C. Test the Product Positions. Use the PSBs (product select buttons) to select each position called for in the
following procedures. If your system does not include PSBs, find the extra PSB supplied with the 980 and
plug the PSB into one of the small 2-pin PSB headers at each location called for in the following steps.
1. Connect the test PSB to one position on a switching module belonging to each Product Group and
press the button. Watch for the following signs of normal operation:
• The test PSB lights.
• The 980 SilenTouch
™
LED blinks off momentarily.
• The 980 BUS MONITOR LED flickers orange.
• The product position number that the test PSB is connected to is displayed on the 902 or
903 Control Panel.
• Each product selected with The PSB is displayed in the correct Product Group window on
the 902 or 903.
2. Press a lighted PSB in any group.
• The LED goes out.
• The 902 or 903 displays double dashes (– –) in the respective product group window.