


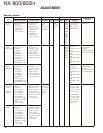

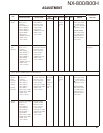


NX-800/800H
57
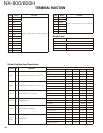
ADJUSTMENT
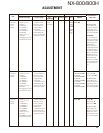
Item
Condition Measurement Adjustment
Specifi cations /
Remarks
Panel test mode PC test mode
Test-
equipment
Unit
Terminal
Unit Parts Method
[Wide] 1) Adj item: [Aw MSK]
Adjust: [
✳✳✳✳
]
PTT: ON
Press [ ] key to store
the adjustment value.
1) Adj item: [MSK
Deviation (Wide)]
PTT: Press
[Transmit] button.
Press [Apply]
button to store the
adjustment value.
Deviation
meter
Oscilloscope
ANT
[Panel
tuning
mode]
[ ],[ ]
[PC test
mode]
[ ],[ ]
Write the value as
followings.
513 (Reference
value)
2.90~3.10kHz
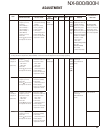
14. CWID
Deviation
adjust *4
[Very
Narrow]
1) Adj item:
[Nv CWID]
Adjust: [
✳✳✳✳
]
Deviation meter
LPF: 3kHz
HPF: OFF
PTT: ON
Press [ ] key to store
the adjustment value.
1) Adj item: [CWID
Deviation]
Deviation meter
LPF: 3kHz
HPF: OFF
PTT: Press
[Transmit] button.
Press [Apply]
button to store the
adjustment value.
Write the value as
followings.
375 (Reference
value)
0.90~1.10kHz
*4: Refer to the “Necessary Deviation adjustment item for each signaling and mode” table on page 57.
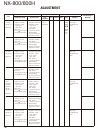
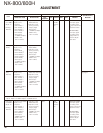
■
Necessary Deviation adjustment for each signaling and mode
The following shows the necessary adjustment items for each signaling deviation. Please read the following table like the following example. In the
case of the signaling “QT (Wide)”, this signaling is composed of three elements [Balance, Maximum Deviation (Analog Wide) and QT Deviation (Wide)].
Please adjust Balance and Maximum Deviation (Analog Wide) before adjusting QT Deviation (Wide).
Mode Signaling
Necessary adjustment and order
Wide Narrow Very Narrow
Analog
Audio
Step1. Balance adjust
Step2. Maximum Deviation (Analog Wide)
Step1. Balance adjust
Step2. Maximum Deviation (Analog Narrow)
-
QT
Step1. Balance adjust
Step2. Maximum Deviation (Analog Wide)
Step3. QT Deviation (Wide)
Step1. Balance adjust
Step2. Maximum Deviation (Analog Narrow)
Step3. QT Deviation (Narrow)
-
DQT
Step1. Balance adjust
Step2. Maximum Deviation (Analog Wide)
Step3. DQT Deviation (Wide)
Step1. Balance adjust
Step2. Maximum Deviation (Analog Narrow)
Step3. DQT Deviation (Narrow)
-
LTR
Step1. Balance adjust
Step2. Maximum Deviation (Analog Wide)
Step3. LTR Deviation (Wide)
Step1. Balance adjust
Step2. Maximum Deviation (Analog Narrow)
Step3. LTR Deviation (Narrow)
-
DTMF
Step1. Balance adjust
Step2. Maximum Deviation (Analog Wide)
Step3. DTMF Deviation (Wide)
Step1. Balance adjust
Step2. Maximum Deviation (Analog Narrow)
Step3. DTMF Deviation (Narrow)
-
2TONE
Step1. Balance adjust
Step2. Maximum Deviation (Analog Wide)
Step3. Single Tone Deviation (Analog
Wide)
Step1. Balance adjust
Step2. Maximum Deviation (Analog Narrow)
Step3. Single Tone Deviation (Analog Wide)
-
MSK
(FleetSync)
Step1. Balance adjust
Step2. Maximum Deviation (Analog Wide)
Step3. MSK Deviation (Analog Wide)
Step1. Balance adjust
Step2. Maximum Deviation (Analog Narrow)
Step3. MSK Deviation (Analog Wide)
-
NXDN
Audio -
Step1. Balance adjust
Step2. Maximum Deviation (NSDN Narrow)
Step1. Balance adjust
Step2. Maximum Deviation (NXDN Very Narrow)
CEID - -
Step1. Balance adjust
Step2. Maximum Deviation (Analog Narrow)
Step3. CWID Deviation (NXDN Very Narrow)
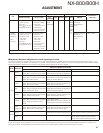
Balance is common with all the above deviation adjustments. If Balance (Transmitter Section5) has already adjusted, please skip Step1 and adjust from Step2.
Maximum Deviation (Analog Wide/Narrow) is common with all the analog signaling deviations and CWID Deviation (NXDN Very Narrow). If Balance and
Maximum Deviation (Analog Wide/Narrow) (Transmitter Section7) have already adjusted, please skip Step2 and adjust from Step3.