


95741 Sixth Edition 4-1
4
Getting Started
This chapter describes only the most common manual operations. It includes
instructions on operating the drive, and how to use the drive. This chapter
contains:
• “Basic Operations” on page 4-1
• “Clean the Drive” on page 4-5
• “Cartridges” on page 4-6
• “Format a Diagnostic Dump Tape” on page 4-10
• “Diagnostic Dump to Tape” on page 4-11
Note: Refer to Chapter 6, “Menu System,” for all drive operations.
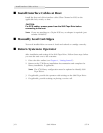
■ Basic Operations
This section provides instructions on:
• “Power-on the Drive”
• “Power-off the Drive” on page 4-2
• “Place the Drive Offline” on page 4-3
• “Place the Drive Online” on page 4-3
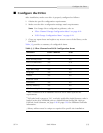
• “View Drive Configuration” on page 4-4
• “View Firmware Release Level” on page 4-4
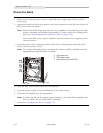
Power-on the Drive
Note: Refer to Chapter 5, “Cartridge Scratch Loader,” for instructions to power-
on a CSL.
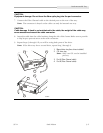
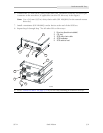
1. To apply power to a desktop unit and/or rack-mountable drive tray:
a. Make sure the power cord is connected to an AC source.
b. Set the
Power switch on the rear panel to ON.
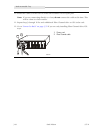
2. To apply power to a library drive power supply that has a
Power switch:
a. Make sure the power cord is connected to a library power strip.
b. Set
Power switch to ON.
3. To apply power to a library drive power supply that does not have a
Power
switch, connect the power supply power cord to a library power strip.