


Rack
3-30 Sixth Edition 95741
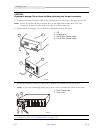
Install Captive Nuts and Nut Plates for First Tray
Captive nuts are used to secure the tray to the rack while nut plates are used to
secure the slide-rail assemblies to the rack. The procedure for installing captive
nuts and nut plates is unique for each type of tray.
Install captive nuts and nut plates in the highest rack location by following the
appropriate procedure. The drive tray procedure follows below while the CSL
procedure begins on page 3-32.
If more that one tray is being installed in the rack, additional procedures are
available at “Additional Tray Rack-hardware Installation” on page 3-35.
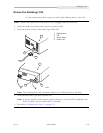
Drive Tray Nuts and Nut Plates
Use the instructions below to install the drive tray captive nuts (PN 3000517xx)
and nut plates in the vertical frame members of the rack:
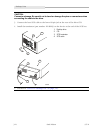
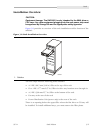
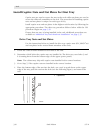
1. Locate the vertical frame members at the front of the rack.
2. Determine which holes the captive nuts are installed in. The drive tray uses holes 3 and
8 (counting down from the bottom edge of the upper spacer panel).
Note: The cabinet may ship with captive nuts installed in the correct locations.
3. Go to Step 5, if the captive nuts are installed in the correct location.
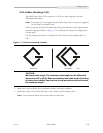
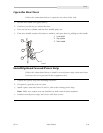
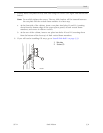
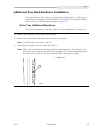
4. Place the bottom edge of the nut into the hole, use a tool to push down on the upper
edge of the nut, push the nut into the hole (see the following figure), and remove the
tool.
1. Captive nut
E53256
1