


TASCAM DA-98HR 23
4 – Menu operations
Read this section to understand the basic principles
of menu operation. This will help you find your way
round the DA-98HR’s functions easily and quickly.
4.1 The menus
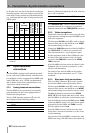
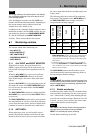
The DA-98HR has fifteen menu groups, labeled from
0 through 9, and A, B, D, E and F. These are referred
to in this manual as “menu group 0”, menu group E”,
etc.
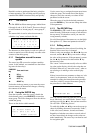
The menu which is used to select these menus is
called the “top” menu, and looks like this
The bottom row of the display is used as a quick ref-
erence to remind you of the currently-set value or the
contents of the menu group.
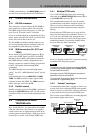
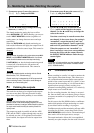
4.1.1 Navigation around the menu
system
The cursor keys Y are used to navigate round the
screen. In this manual, we sometimes use the follow-
ing terms for these keys:
Notice that in the top menu, as you move the cursor
between menus, the bottom line changes, reflecting
the contents of the menu.
4.1.2 Using the ENTER key
From the top menu, when the cursor is beside the
desired menu group, press
ENTER Z to enter that
menu group. The screen changes to show the choices
within that group.
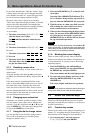
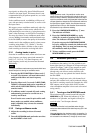
These are the choices within menu 0:
Use the cursor keys to navigate between menu items
within the group. The bottom line of the display
changes to show the currently-set values for the
parameter beside the cursor.
When the cursor is beside the desired parameter,
press the
ENTER key. You can now change the values
of that parameter.
4.1.3 The ESCAPE key
The ESCAPE key a is used to move up through the
menu hierarchy (from menu screens to sub-menus to
the top menu). It is therefore used if you enter the
wrong menu by mistake.
For a full description of the menu tree, see the Quick
Start guide or 11, “Menu and parameter reference”.
4.1.4 Editing values
When a parameter has been selected for editing, the
function of the cursor keys is changed.
If there is only one parameter, the Ó and Á keys are
not used, and the § and ¶ keys are used to change
the value of the parameter. If the parameter is a num-
ber, the § key increases the value and the ¶ key
decreases the value.
The “cursor” in these menus usually refers to a blink-
ing value on the display, which is the value that can
be edited. When we say “move the cursor”, what we
are referring to is making a value on the display
blink.
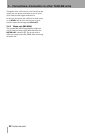
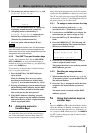
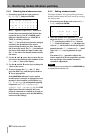
If there is more than one parameter or there are “sub-
values” to the parameter, such as in the following
example for setting the internal timecode generator
start time ( which is accessed from menu group 8),
the procedure is a little different:
Here, the internal timecode generator start time can
be set. Obviously, we could edit the “frames” field
and keep pressing the § key, but one hour would be
30 x 60 x 60 = 10,800 key presses!
To avoid this, the Á and Ó keys move the cursor (as
shown by blinking characters) between the “fields”;
in this case, hours, minutes, seconds and frames.
Regardless of whether one value or several sub-val-
ues have been edited, the changes to the values are
made immediately. The cursor keys can then be used
for navigation again.
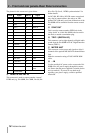
Select Menu Group
˘01234567
89AB.DEF
Dly/InPach/Vari/Loct
CURSOR
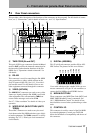
key
Term used in text
§
UP
key
¶
DOWN
key
Ó
LEFT
key
Á
RIGHT
key
˘Delay Memo 1
In Patch Memo 2
Vari Spd Loc Pre
1 0000 Sample
Generate Start Time
00:00:00:00 30NDF