


Table of Contents
4 TASCAM DA-98HR
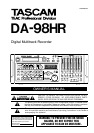
1 – Introduction to the DA-98HR
1.1 Unpacking .....................................................7
1.2 Features.........................................................7
1.3 Using this manual.........................................8
1.3.1 How this manual is organized.......................8
1.3.2 Typographic conventions .............................8
1.4 Notes and precautions.................................8
1.4.1 Clock source in a digital studio....................9
1.4.2 Confidence replay..........................................9
1.4.3 Environmental conditions.............................9
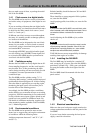
1.4.4 Installing the DA-98HR ..................................9
1.4.5 Electrical considerations...............................9
1.4.6 Condensation .................................................10
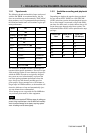
1.5 Recommended tapes....................................10
1.5.1 Tape brands....................................................11
1.5.2 Available recording and playback time........11
2 – Front and rear panels
2.1 Front Panel controls.....................................12
2.2 Rear Panel connectors.................................17
3 – Connections
3.1 Audio connection .........................................19
3.1.1 Analog audio connections (optional
IF-AN98HR)...........................................................19
3.1.2 Digital audio connections (using TDIF-1) ....19
3.1.3 Digital audio connections (using AES/EBU)19
3.2 Synchronization connections......................20
3.2.1 Analog timecode connections......................20
3.2.2 Video connections .........................................20
3.2.3 Word sync clock connections ......................20
3.3 Control connections.....................................21
3.3.1 RS-422 connector...........................................21
3.3.2 MIDI connectors (IN , OUT and THRU) .........21
3.3.3 Parallel control ...............................................21
3.4 Connection to other TASCAM units............21
3.4.1 Multiple DTRS units .......................................21
3.4.2 “Indirect” word sync......................................21
3.4.3 Meter unit (MU-8824)......................................22
4 – Menu operations
4.1 The menus.....................................................23
4.1.1 Navigation around the menu system ...........23
4.1.2 Using the ENTER key.....................................23
4.1.3 The ESCAPE key............................................23
4.1.4 Editing values.................................................23
4.1.5 Resetting a menu value.................................24
4.1.6 Changing menu values fast ..........................24
4.1.7 Using the dial to change values ...................24
4.1.8 Blanking the screen display..........................24
4.2 About the function keys...............................24
4.2.1 Function key modes ......................................24
4.2.2 The SHIFT key and function keys.................25
4.3 Assigning menus to function keys .............25
4.3.1 To assign a menu screen to a key................25
4.3.2 Recalling an assigned menu function..........25
4.4 Using the function keys as number keys... 25
5 – Monitoring modes
5.1 Monitoring controls...................................... 27
5.1.1 ALL INPUT and INPUT MONITOR .................27
5.1.2 AUTO MON......................................................27
5.1.3 Shuttle monitoring.........................................27
5.2 Patching the outputs.................................... 28
5.3 Confidence mode .........................................28
5.3.1 Arming tracks in pairs ...................................29
5.3.2 Using confidence mode.................................29
5.4 Mixdown patchbay ....................................... 29
5.4.1 Turning on the MIXDOWN mode...................29
5.4.2 Selecting the mixdown sources ...................30
5.4.3 Setting mixdown levels .................................30
6 – Basic Operations
6.1 Word sync settings ...................................... 31
6.1.1 Selecting the word sync clock......................31
6.1.2 Setting the AES/EBU channel for the
word sync source................................................31
6.1.3 Clock range with slot board..........................31
6.2 Formatting a tape ......................................... 32
6.2.1 Available tracks..............................................32
6.2.2 The format process........................................32
6.2.3 Aborting the format process.........................33
6.2.4 Recording while formatting...........................33
6.3 Recording the first tracks............................ 33
6.3.1 Preparing to record........................................34
6.3.2 Selecting the digital source ..........................34
6.3.3 Selecting input sources.................................34
6.3.4 Write-protecting cassettes............................34
6.3.5 Recording the basic tracks (i).......................34
6.3.6 Recording the basic tracks (ii)......................35
6.3.7 Replaying the first tracks..............................35
6.4 Overdubbing ................................................. 35
6.5 Track bouncing............................................. 35
6.6 Punch-in and punch-out .............................. 35
6.6.1 Overview of punch procedures ....................36
6.6.2 Automatic punch point setting.....................36
6.6.3 Setting punch points “on the fly”.................36
6.6.4 Setting and editing punch points using the
menus...................................................................37
6.6.5 Editing the preroll and postroll times ..........37
6.6.6 Rehearsing the punch-in...............................38
6.6.7 Interrupting a rehearsal or punch recording38
6.6.8 Recording the punch-in.................................38
6.6.9 Reviewing the punched material ..................39
6.6.10 Exiting punch-in mode ................................39
7 – Advanced operations
7.1 Autolocation..................................................40
7.1.1 Setting MEMO 1 and MEMO 2 “on the fly”...40