


6 – Basic Operations–Punch-in and punch-out
36 TASCAM DA-98HR
edited to sample accuracy, either from a list of
numerical values or “on-the-fly” in real time.
The DA-98HR provides a rehearsal mode which sim-
ulates the punching process, allowing the artists to
perfect the timing of the new material.
The mechanics of punching on a digital recorder
appear to the operator to be the same as on an analog
recorder.
Crossfading, however, is an important and useful
function on digital recorders, to ensure continuity
between original and punched material. In the case of
the DA-98HR, this crossfade time is adjustable from
10 milliseconds to 200 milliseconds (7.4, “Crossfade
time”) .
The
AUTO MON mode is essential here: in both
rehearsal and punch modes, the material prior to the
punch point is monitored from the tape. The monitor-
ing of armed tracks changes to source while rehears-
als and punching are carried out and then changes to
monitoring the tape again after the punch-out point.
6.6.1 Overview of punch procedures
A typical way in which a punch is performed (this is
all explained in more detail later in this section) is:
1 Press the
AUTO MON key i to enable auto-
matic monitor switching (see 5, “Monitoring
modes”).
2 Press the
RHSL key L to put the unit into
“rehearsal learn” mode and set the punch
points using the
RECORD and PLAY keys.
Fine-tune the punch points if necessary using
the menu system (6.6.4, “Setting and editing
punch points using the menus”).
3 Press the
RHSL key again to start rehearsing
the punch. When
PLAY is pressed, the unit
drops into simulated record mode at the punch
in point and out again at the punch-out point.
It also automatically rewinds to an appropriate
pre-roll point following the punch-out. No new
material is recorded at this stage (6.6.6,
“Rehearsing the punch-in”).
4 When ready for the take, press the
AUTO
PUNCH
key M so that the indicator flashes.
Now when
PLAY is pressed, the unit records at
the punch-in point and drops out at the punch-
out point (6.6.8, “Recording the punch-in”).
5 To replay and check the punch, press
PLAY to
play back the original and the punched mate-
rial (6.6.9, “Reviewing the punched material”).
The
AUTO PUNCH indicator is now steadily lit.
6 Press
AUTO PUNCH (flashing indicator) again
to re-record the punch, or unarm the track(s)
and press
CLEAR G to exit the punch mode.
NOTE
Although it is theoretically possible to perform punch
recording in either the confidence mode (5.3, “Confidence
mode”) or the ALL INPUT mode (5.1.1, “ALL INPUT and
INPUT MONITOR”) , the monitoring in these modes does
not make it easy to perform accurate punch operations. We
suggest that you turn these modes off if you want to per-
form punch operations.
6.6.2 Automatic punch point setting
Whenever recording takes place, the time when
recording begins is automatically stored as a punch-
in time, and the time when recording stops (when
either the
STOP or the PLAY key is pressed) is stored
as a punch-out time.
There are other ways in which you can set these
points, as described below:
6.6.3 Setting punch points “on the fly”
This method demands sharp reflexes (but you can
edit the punch points later as we show below).
1 Press the
AUTO MON key i (the indicator
lights).
2 Arm the track(s) on which you will be record-
ing (use the
REC FUNCTION keys). The INPUT
MONITOR
indicator(s) of any armed track(s)
light and monitoring changes to input source
recording for these tracks.
3 Press the
RHSL (rehearsal) key L.
The indicator flashes, showing that the DA-
98HR is in “rehearsal learn” mode.
4 Rewind the tape to before where the punch is
to occur.
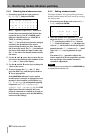
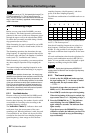
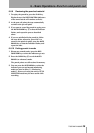
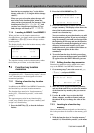
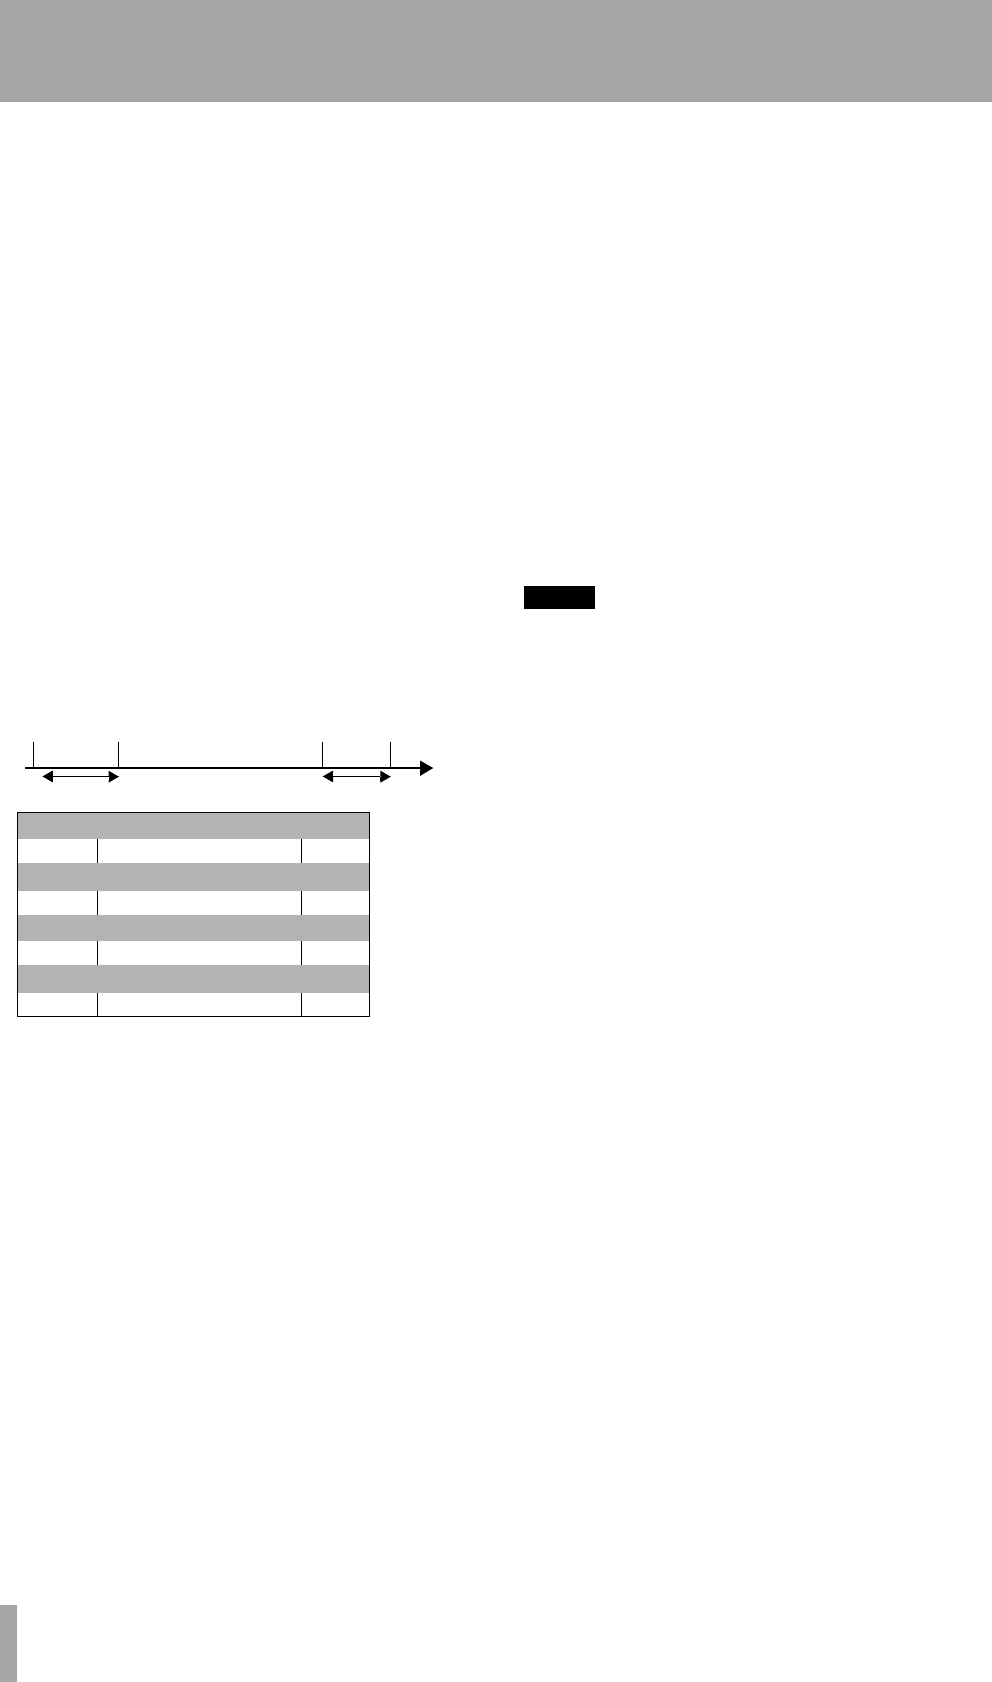
Pre-roll
point
Punch-in
point
Post-roll
point
Punch-out
point
Pre-roll time Post-roll time
Rehearsal learn
TAPE SOURCE TAPE
Rehearsal
TAPE SOURCE TAPE
AUTO PUNCH
TAPE SOURCE TAPE
Replay check
TAPE TAPE TAPE