


6 – Basic Operations–Recording the first tracks
34 TASCAM DA-98HR
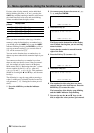
If the tape counter shows a negative value, you cannot
record on the tape at that position.
6.3.1 Preparing to record
1 If you have not already loaded a formatted
blank tape, do so now.
2 Make sure that varispeed is turned off (check
the
VARI SPEED indicator A and use the
menu item (see 7.5, “Vari speed (pitch con-
trol)”) to turn it off if necessary).
6.3.2 Selecting the digital source
The DA-98HR has two built-in digital input sources:
for AES/EBU and TDIF-1 format data. Each of these
connectors can accept and output eight channels of
base-frequency audio. Either of these inputs can be
selected:
1 Use the
AES/EBU key D to select between the
TDIF-1 and the AES/EBU inputs and outputs.
If the indicator is lit, the AES/EBU connector
p will be used, otherwise the TDIF-1 connec-
tor
u will be active.B
Note that this only selects the source—digital signals
are always output from both the TDIF-1 and the
AES/EBU connectors.
6.3.3 Selecting input sources
The DA-98HR contains a flexible input patchbay,
which allows signal sources to be selected between
digital, analog (if the optional IF-AN98HR slot board
set has been installed), recorded tracks on the tape
(for track bouncing), and muting.
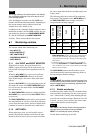
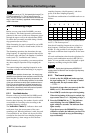
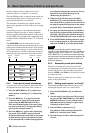
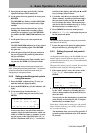
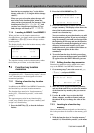
1 Press the
INPUT PATCH key C so that the indi-
cator a screen similar to the example below
appears (this assumes that all eight tracks are
available for recording at the base frequency):
Alternatively, select menu group 1, move the
cursor to
In Patch, and press ENTER.
In this screen above, the
Src line shows the
possible signal sources:
T for tape, S for an
optional slot input card,
D for digital and M for
mute. The ch line indicates the input channels
available from these sources (except for the
mute setting, which naturally does not have
any sources, and therefore is always repre-
sented by a
-).
2 Use the Ó and Á keys to move the cursor
along a line.
3 Use the § and ¶ keys to change the parame-
ter value.
4 To move between lines, press the
SHIFT key,
and then press the § or ¶ key as appropriate.
Pressing the § or ¶ keys together will nor-
malize the settings so that there is a one-to-one
correspondence between slot channels and tape
tracks.
With a digital recorder such as the DA-98HR, track
crosstalk is almost negligible (better than 90dB at
1kHz). For this reason, you do not have to worry so
much about the constraints of choosing physical
track locations as you do with analog recordings.
Note that this function can also be used for track
copying later in the recording process. Remember
that track copying in the digital domain will add no
noise or distortion. A digital copy is a “clone” of the
original, and no loss of quality is incurred.
6.3.4 Write-protecting cassettes
If you attempt to record on a cassette where the
write-protect tab has been closed, an error message
will appear on the screen as you press the
RECORD
key. Recording is, of course, not possible on a write-
protected cassette.
Hi8 cassette write tabs work in the opposite manner
to DAT cassettes, and “closed” means “write-
protect”.
If the tape is write-protected, the
REC INHI indicator
to the left of the tape counter will be lit. Eject the
tape, open the write-protect tab, replace the cassette,
and try again.
NOTE
Sony Hi8 cassettes (and those from some other manufac-
turers) have the words “SAVE” (write-protected) and “REC”
(write-enabled) molded into the cassette shell by the pro-
tection tab.
6.3.5 Recording the basic tracks (i)
1 Arm the tracks on which you wish to record by
pressing the
REC FUNCTION key of these
tracks; the indicator starts flashing. Remem-
ber that you can only arm those tracks whose
AVAILABLE TRACK indicators are lit.
Input Patch
Trk12345678
SrcTMSSDMSS
ch1-345-88