44-EN
01GB06IVA310.fm
ALPINE IVA-D310 68-02278Z28-A (EN)
7
Touch [RETURN] to return to the previous screen.
Touch [CONTROL] to return to the main source screen
which was previously set.
• When you download the data again, the data is overwritten in
Preset 6.
Downloading the MY BACKGROUND data
1
Insert the CD-R/CD-RW disc containing the data you
need.
After sensing the disc, the DATA DOWNLOAD screen is
displayed.
2
Touch [] or [] of MY BACKGROUND, then select
USERS1 or USERS2.
The selected wallpaper can be changed.
3
Touch [] of MY BACKGROUND.
Data search of the disc starts. After completing the data
search, the file selection screen of Data Download is
displayed.
4
Touch [] or [] to select the desired file name.
5
Touch [MEMORY].
Data download starts.
When data downloading has completed correctly, the
screen returns to the DATA DOWNLOAD screen.
6
Touching [RETURN] returns to the previous screen.
Touching [CONTROL] returns to the earlier main source
screen.
• If data is newly downloaded, the data overwrites the previous data.
• If the battery power cable is removed, the downloaded data is
memorized.
• You can recall a wallpaper in “Switching Background Textures”
(page 36), or “Setting Automatic Background Textures” (page 36).
• When download has completed, remove the disc.
Recalling the Display of the External
Amplifier Setting and Status (Option)
When an external amplifier (MRV-F545, MRV-F345, MRD-M1005,
MRD-M605) is connected, you can set it from this unit. Up to eight
amplifiers can be set.
• If amplifier settings are made on the unit, do not then change the
setting with the amplifier buttons, as the amplifier display may not
match the operation of the unit.
• To make the setting, set to “Setting the VISUAL Touch Button” (page
34).
1
Touch [VISUAL] on the main source screen.
The VISUAL selection screen appears.
2
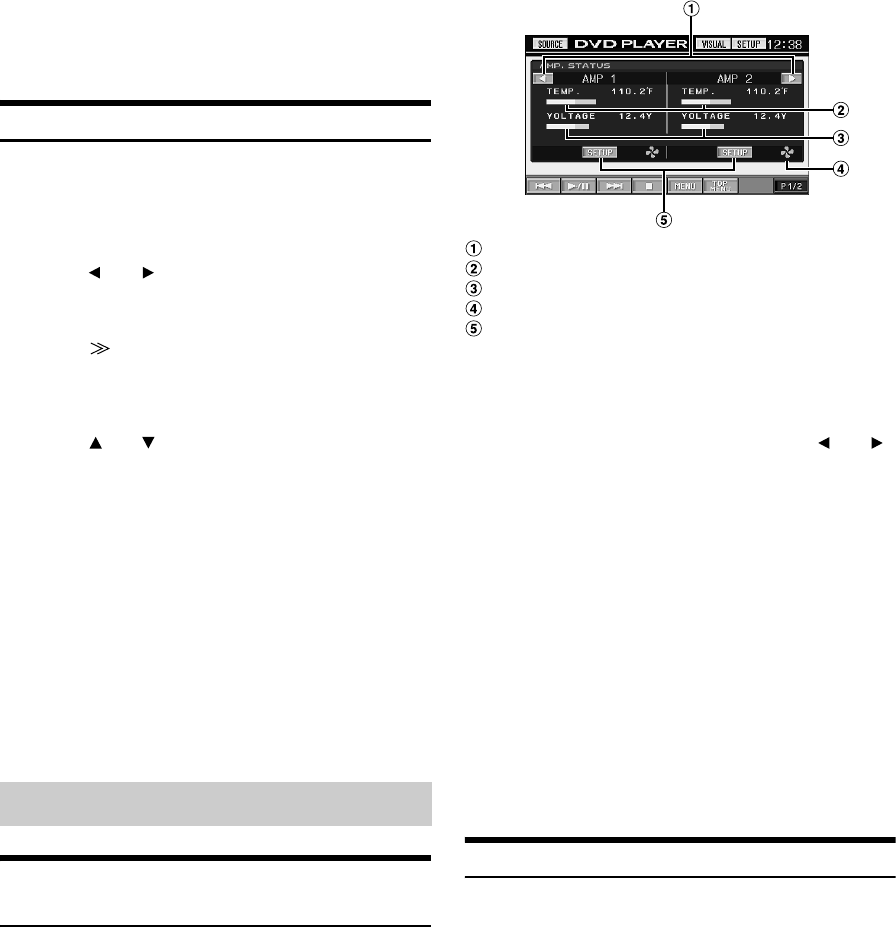
Touch [AMP STATUS].
The AMP status screen is displayed.
AMP status screen display example
Turns pages
Temperature (°F)
Voltage (V)
Lights up when FAN is activated
Selected AMP Setup screen appears.
3
Touch [SETUP] on the AMP status screen.
The screen changes to the AMP SETUP screen of the
selected AMP.
4
Set the desired setting mode by touching [] or [].
5
To set another amplifier, touch [RETURN], and
repeat steps 3 and 4.
6
To cancel the AMP status screen, touch [VISUAL].
The VISUAL screen appears.
7
Touch [NORMAL].
The screen returns to the normal screen.
AMP Link Lock Function
This setting has a function that prevents accidental adjustment of the
INPUT GAIN in order to prevent speaker damage.
1
Touch and hold [RETURN] for at least 3 seconds on
the AMP SETUP screen.
The LOCK mode is turned on, and the setting mode for
INPUT GAIN becomes inactive when the AMP SETUP
screen is displayed, and “LOCK” is displayed in the setting
content next time.
To be functional the setting mode for INPUT GAIN, the
LOCK mode is canceled by touching and holding
[RETURN] for at least 3 seconds on the AMP SETUP screen.
Setting AMP Link (Optional)
Setting mode: AMP DISPLAY
Setting contents: TEMP.(C)/TEMP.(F)/VOLT./SCAN
Displays the indication you set on the connected amplifier.
Setting mode: INPUT GAIN (monaural amplifier connected),
INPUT GAIN CH1/2, CH3/4 (4CH amplifier
connected)
Setting contents: 0.1V to 8V (monaural amplifier connected)
0.2V to 4V (4CH amplifier connected)
01GB00IVAD310.book Page 44 Wednesday, December 1, 2004 4:20 AM
