


22
IntelliTouch ScreenLogic User’s Guide
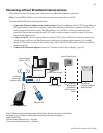
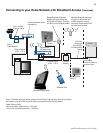
Connecting to your Home Network with Broadband Access
While not a requirement to run ScreenLogic, IntelliTouch ScreenLogic can coexist with and utilize your existing
home network’s Broadband connection. There must be either an Ethernet-based Cable or DSL modem with an
established Broadband Internet account from an Internet Service Provider (ISP).
By connecting IntelliTouch ScreenLogic to your existing home network you will be able to take advantage of
weather forecast information and current weather conditions in your area. In addition, you can utilize the other
Internet enabled applications that exist on the PDA, Tablet, and in-wall Touch Screen such as Web browsing, e-mail
and much more.
Connecting to an existing home network
To connect to an existing home network:
1. Connect the Protocol adapter to the wireless router: Connect an Ethernet cable (CAT 5) to the Ethernet
RJ45 jack located on the adapter. Connect the other end of the Ethernet cable to PORT 1 of the four
Ethernet LAN ports located on the back of the wireless router. Use a straight-through CAT 5 cable to
connect to wireless router. A crossover cable will not work.
2. Connect to the existing home network router: Connect an Ethernet cable (CAT 5) to the WAN Port on
the back of the ScreenLogic wireless router. Connect the other end of the Ethernet cable to a LAN Port on
the existing home network router. The existing home network router can be wired or wireless. Use a straight-
through CAT 5 cable to connect to wireless router. A crossover cable will not work.
Note: The existing home wired or wireless router needs to be set to Dynamically Assign IP (DHCP
enabled) addressing in order to assign a Subnet to the IntelliTouch wireless router to operate with the
IntelliTouch ScreenLogic system.
Note: For users with Broadband Internet connections, Pentair always recommends that the
homeowner have an existing wired or wireless router connected to their DSL or Cable modem. The
ScreenLogic wireless router should always be setup to piggy-back off this existing router and never
should be setup to be the only router directly plugged into the DSL or Cable modem.
3. Connect in-wall touch screen to the IntelliTouch wireless router: If you have an in-wall touch screen
(iTC35 Kit P/N 520502), connect an Ethernet cable (CAT 5) from the bottom RJ45 jack of the in-wall to the
LAN Port on the back of the IntelliTouch wireless router.
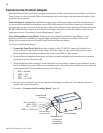
4. Connect to the Protocol adapter: Proceed to “Connect to the Protocol Adapter,” page 24.
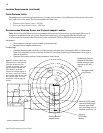
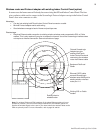
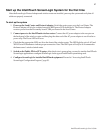
Installing the Range Extender Wall-Plugs for Large Homes/Properties
For larger homes and properties, you may need to use the wireless Range Extender kit (P/N 520561) to transfer
the wireless signal to the room near where the wireless Tablet and/or PDA will be primarily used. The following
diagram illustrates the wireless Range Extender connection.
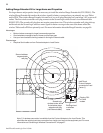
To install the wireless Range Extender wall-plugs:
1. Connect the Ethernet cable (RJ45/CAT5) from the Ethernet Bridge Range Extender wall-plug to a LAN port
on the ScreenLogic wireless router.
2. Plug the Ethernet Bridge Range Extender wall-plug into an AC power wall outlet near the wireless router.
3. Plug the other Range Extender wall-plug into an AC power wall outlet located in a room where the wireless
Tablet and/or the PDA will primarily be used. When all three LEDs on the Range Extender are lit, the
installation is complete.