


TELEDYNE INSTRUMENTS
460L Instruction Manual A Primer on Electro-Static Discharge
05228 Rev B 73
DCN 5164 PRINTED DOCUMENTS ARE UNCONTROLLED
While this layer may equalizes any charges that occur across the whole bag, it does not
prevent the build-up of static charges. If laying on a conductive, grounded surface, these
bags will allow charges to bleed away but the very charges that build up on the surface of
the bag itself can be transferred through the bag by induction onto the circuits of your ESD
sensitive device. Also, the liquid impregnating the plastic is eventually used up after which
the bag is as useless for preventing damage from ESD as any ordinary plastic bag.
Anti-Static bags made of plastic impregnated with metal (usually silvery in color) provide all
of the charge equalizing abilities of the pink-poly bags but also, when properly sealed,
create a Faraday cage that completely isolates the contents from discharges and the
inductive transfer of static charges.
Storage bins made of plastic impregnated with carbon (usually black in color) are also
excellent at dissipating static charges and isolating their contents from field effects and
discharges.
Never use ordinary plastic adhesive tape near an ESD sensitive device or to close an
anti-ESD bag. The act of pulling a piece of standard plastic adhesive tape, such as
Scotch
®
tape, from its roll will generate a static charge of several thousand or even tens of
thousands of volts on the tape itself and an associated field effect that can discharge
through or be induced upon items up to a foot away.
12.4.2. Basic anti-ESD Procedures for Analyzer Repair and
Maintenance
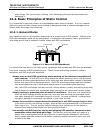
12.4.2.1. Working at the Instrument Rack
When working on the analyzer while it is in the instrument rack and plugged into a properly
grounded power supply
1. Attach you anti-ESD wrist strap to ground before doing anything else.
Use a wrist strap terminated with an alligator clip and attach it to a bare metal portion of
the instrument chassis.
This will safely connect you to the same ground level to which the instrument and all of its
components are connected.
2. Pause for a second or two to allow any static charges to bleed away.
3. Open the casing of the analyzer and begin work. Up to this point, the closed metal casing
of your analyzer has isolated the components and assemblies inside from any conducted
or induced static charges.
4. If you must remove a component from the instrument, do not lay it down on a non-ESD
preventative surface where static charges may lie in wait.
5. Only disconnect your wrist strap after you have finished work and closed the case of the
analyzer.
12.4.2.2. Working at an Anti-ESD Work Bench.
When working on an instrument of an electronic assembly while it is resting on a anti-ESD
workbench
1. Plug your anti-ESD wrist strap into the grounded receptacle of the work station before
touching any items on the work station and while standing at least a foot or so away.