


100
Set up speakers
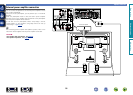
7.1ch + Front B
Assigns power amplifiers within this unit as
follows: 7.1ch for MAIN ZONE and 2ch for the
second front speaker connection. In this case, go
to step 6.
Discrete 11.1ch
Assigns 9.1ch for power amplifiers within this unit
and 2ch (front/front height) for the external power
amplifier connection. Up to 11.1ch playback is
available. In this case, go to step 7.
Pre Amplifier
Connects all speakers by using an external power
amplifier and uses this unit as a preamplifier. In
this case, go to step 8.
Custom
Assigns power amplifiers within this unit as you
prefer. In this case, go to step 10.
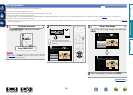
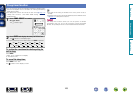
6
Use ui to select “Main Speakers” and use o p
to select the speakers that output audio in MAIN
ZONE.
S.Back/F.Height
Outputs audio from the surround back and front
height speakers.
S.Back/F.Wide
Outputs audio from the surround back and front
wide speakers.
F.Height/F.Wide
Outputs audio from the front height and front
wide speakers. When the setting is completed,
go to step 11.
7
Use ui to select “Main Pre-amps” and use o p
to select the PRE OUT connectors that connect the
external power amplier.
Front
Connects the front channel PRE OUT connectors
to the external power amplifier.
Front Height
Connects the front height channel PRE OUT
connectors to the external power amplifier. When
the setting is completed, go to step 11.
8
Use ui to select “Pre-amp Assign” and use o p to
select how to use the PRE OUT connectors.
All
Select this to use the PRE OUT connectors
without using power amplifiers within this unit
and use this unit as a preamplifier.
Custom
Sets whether to use each channel as a preamplifier
or use speakers. When the setting is completed,
go to step 9.
9
Use ui to select a channel to set and use o p to
make the setting.
Speaker
Select this to use speakers.
Pre-amp out
Select this to output audio only from the PRE OUT
connectors. When the setting is completed, go to
step 11.
10
Use ui to select a speaker and use o p to set audio
output from each speaker connector as you prefer.
•For details, see “Assign Mode” (vpage141).
11
Press ENTER.
12
Press o or BACK to exit the “Amp Assign” setting.
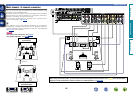
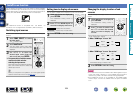
5
Use o p to select the
conguration of the connected
speakers, and then press
ENTER.
9.1ch
(SB/FH/FW)
Assigns all power amplifiers within this unit for
MAIN ZONE. Up to 9.1ch playback is available. In
this case, go to step 6.
7.1ch + ZONE2
Assigns power amplifiers within this unit as
follows: 7.1ch for MAIN ZONE and 2ch for
ZONE2. In this case, go to step 6.
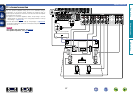
5.1ch + ZONE2/3
Assigns power amplifiers within this unit as
follows: 5.1ch for MAIN ZONE and 2ch for ZONE2
and ZONE3 each. In this case, go to step 11.
7.1ch +
ZONE2/3-MONO
Assigns power amplifiers within this unit as
follows: 7.1ch for MAIN ZONE and 1ch for ZONE2
and ZONE3 each. In this case, go to step 6.
7.1ch(Bi-Amp)
Assigns power amplifiers within this unit as
follows: 7.1ch for MAIN ZONE and 2ch for the
front speaker bi-amplifier connection. In this case,
go to step 6.
5.1ch(Bi-Amp) +
ZONE2
Assigns power amplifiers within this unit as
follows: 5.1ch for MAIN ZONE, 2ch for the front
speaker bi-amplifier connection, and 2ch for
ZONE2. In this case, go to step 11.
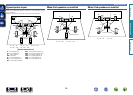
9.1ch/
2ch Front
Assigns all power amplifiers within this unit for
MAIN ZONE. Up to 9.1ch playback is available.
You can also use a front speaker that is different
from the one used during multi-channel playback
for playback by switching the internal power
amplifier during 2ch playback. In this case, go to
step 6.
7.1ch/2ch
Front(Bi-Amp)
Assigns power amplifiers within this unit as
follows: 7.1ch for the MAIN ZONE multi-channel
playback. You can also use a front speaker that is
different from the one used during multi-channel
playback for playback under the bi-amplifier
connection by switching the internal power
amplifier during 2ch playback. In this case, go to
step 11.
Basic version
Advanced version
Informations
Advanced version
v See overleaf
DVD