


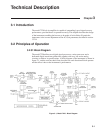

2-3
Chapter 2, INSTALLATION AND INITIAL CHECKS
installed, close the plastic door firmly. The correct selected voltage setting should now
be showing through the rectangular window. Ensure that only fuses with the required
current rating and of the specified type are used for replacement. The use of
makeshift fuses and the short-circuiting of fuse holders is prohibited and potentially
dangerous.
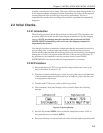
2.2 Initial Checks
2.2.01 Introduction
The following procedure checks the performance of the model 7220. In general, this
procedure should be carried out after inspecting the instrument for obvious shipping
damage (NOTE: any damage must be reported to the carrier and to EG&G
INSTRUMENTS immediately; take care to save the shipping container for
inspection by the carrier).
Note that this procedure is intended to demonstrate that the instrument has arrived in
good working order, not that it meets specifications. Each instrument receives a
careful and thorough checkout before leaving the factory, and normally, if no shipping
damage has occurred, will perform within the limits of the quoted specifications. If
any problems are encountered in carrying out these checks, contact EG&G
INSTRUMENTS or the nearest authorized representative for assistance.
2.2.02 Procedure
1) Ensure that the model 7220 is set to the line voltage of the power source to be
used, as described in section 2.1.05
2) With the rear panel mounted power switch (located at the extreme left-hand side
of the instrument when viewed from the rear) set to 0 (off), plug in the line cord
to an appropriate line source.
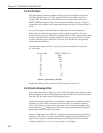
3) Turn the model 7220 power switch to the I (on) position.
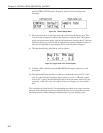
4) The instrument’s front panel displays will now briefly display the following
message:-
Figure 2-2, Opening Display
5) Press the key marked MENU twice to enter the setup menu screens. (N.B. on
early units this key was marked AUTO).
6) Press one of the keys on the left-hand side of the left-hand display repeatedly until