


Advanced Operations
En-80
Operating
procedure
(➔ page 61)
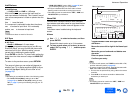
■ InstaPrevue
These settings apply to “InstaPrevue” of the Home
menu
(➔ page 56) and specify the preview display of
HDMI video streams.
Sub Window
`Multi
:
Displays preview thumbnails all at once.
`Single:
Displays preview thumbnails one-by-one.
With this setting, you can set the number of preview
thumbnails displayed.
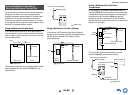
Position
(with “Sub Window” set to “Multi”)
`Top, Bottom
, Left, Right
(with “Sub Window” set to “Single”)
`Upper Left, Upper Right, Lower Left, Lower
Right
With this setting, you can set the position of preview
thumbnails on the TV screen.
Note
• Depending on video signals, the picture may not be
properly rendered on the preview thumbnails of
InstaPrevue.
Auto Standby
■ Auto Standby
`Off
`On
When “Auto Standby” is set to “On”, the AV receiver
will automatically enter standby mode if there is no
operation for 30 minutes with no audio and no video
signal input.
“Auto Standby” will appear on the AV receiver’s
display and OSD 30 seconds before the Auto
Standby comes on.
Default setting: On (European and Australian
models), Off (North American models)
Note
• Set to “
On”, the Auto Standby function may activate itself
during playback with some sources.
• The Auto
Standby function does not work when Zone 2/3 is
on.
■ HDMI Through
`Off
`On
This setting enables or disables the Auto Standby
during HDMI Through by detecting the audio/video
input signal.
When this setting is set to “On”, the AV receiver will
automatically enter standby mode if there is no audio
and no video signal input during HDMI Through for 30
minutes. (The Auto Standby function does not work
when Zone 2/3 is on.)
When this setting is set to “Off”, the status of HDMI
Through is continued regardless of audio/video input
signal.
Tip
• Entering standby mode is possible by setting “HDMI CEC
(RIHD)” to “On” and using CEC-compatible component
regardless of the above-mentioned setting.
See “HDMI CEC (RIHD)” in “7. Hardware Setup” for linked
operation (➔ page 78).
• When the HDMI Through is enabled, the power
consumption slightly increases.
Note
• This setting is fixed to “Off” when “Auto Standby” is set to
“Off”.
Network
This section explains how to configure the AV
receiver’s network settings manually.
After modifying the network settings, you must
confirm the changes by executing “Save”.
If your router’s DHCP server is enabled, you don’t
need to change any of these settings, as the AV
receiver is set to use DHCP to configure itself
automatically by default (i.e., DHCP is set to
“Enable”). If, however, your router’s DHCP server is
disabled (you’re for example using static IP), you’ll
need to configure these settings yourself, in which
case, a knowledge of Ethernet networking is
essential.
What’s DHCP?
DHCP (Dynamic Host Configuration Protocol) is used
by routers, computers, the AV receiver, and other
devices to automatically configure themselves on a
network.
What’s DNS?
The DNS (Domain Name System) translates domain
names into IP addresses. For example, when you
enter a domain name such as www.onkyousa.com in
your Web browser, before accessing the site, your
browser uses DNS to translate this into an IP
address, in this case 63.148.251.142.
■ Network Connection
`Wired
`Wireless
This setting determines whether you connect the AV
receiver to network by wired LAN or wireless LAN. If
you connect by wireless LAN, select “Wireless”. See
“Performing Wireless LAN Setup” for setting
(➔ page 31).
Tip
• The same setting is available even if “Wireless” is selected
in “Network Connection” in initial setup (➔ page 27).