


Appendix
En-98
■ The beginning of audio received by an HDMI IN
can’t be heard
■ There’s no sound during Whole House Mode
■ There’s no picture
■ There’s no picture from a source connected to
an HDMI IN
■ The on-screen menus don’t appear
■ The on-screen information does not appear
■ Reception is noisy, FM stereo reception is noisy,
or the FM STEREO indicator doesn’t light
■ The remote controller doesn’t work
■ Can’t control other components
Since it takes longer to identify the format of an HDMI
signal than it does for other digital audio signals, audio
output may not start immediately.
Make sure you’ve selected an analog audio, NET or USB
input.
Video
Make sure that all video connecting plugs are pushed in all
the way. (➔ page 22)
Make sure that each video component is properly
connected. (➔ page 19)
If your TV is connected to the HDMI output(s), select
“-----” in the “HDMI Input” setting to watch composite
video, and component video sources. (➔ page 63)
If the video source is connected to a component video
input, you must assign that input to an input selector, and
your TV must be connected to either the HDMI output(s) or
COMPONENT VIDEO OUT. (➔ pages 19, 64)
If the video source is connected to a composite video input,
your TV must be connected to the HDMI output(s) or the
corresponding composite video output. (➔ page 19)
If the video source is connected to an HDMI input, you
must assign that input to an input selector, and your TV
must be connected to the HDMI output(s). (➔ pages 19,
63)
While the Pure Audio listening mode is selected, the
analog video circuitry is turned off and only video signals
input through HDMI IN can be output. (➔ page 45)
On your TV, make sure that the video input to which the AV
receiver is connected is selected.
When the “Monitor Out” setting is set to “Both”, the “HDMI
Through” setting is only available for the HDMI OUT MAIN
jack. (➔ pages 62, 78)
Reliable operation with an HDMI-to-DVI adapter is not
guaranteed. In addition, video signals from a PC are not
guaranteed. (➔ page 107)
When the resolution is set to any resolution not supported
by the TV, no video is output from the HDMI outputs.
(➔ page 63)
If the message “Resolution Error” appears on the AV
receiver’s display, this indicates that your TV does not
support the current video resolution and you need to select
another resolution on your DVD player.
On your TV, make sure that the video input to which the AV
receiver is connected is selected.
When the AV receiver is not connected to a TV via HDMI
OUT MAIN, on-screen menus are not displayed.
Depending on the input signal, the on-screen information
may not appear when the input signal from HDMI IN is
output to a device connected to the HDMI output.
Tuner
Relocate your antenna.
Move the AV receiver away from your TV or computer.
Listen to the station in mono. (➔ page 42)
When listening to an AM station, operating the remote
controller may cause noise.
Passing cars and airplanes can cause interference.
Concrete walls weaken radio signals.
If nothing improves the reception, install an outdoor
antenna.
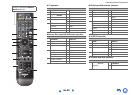
Remote Controller
Before operating this unit, be sure to press RECEIVER.
Make sure that the batteries are installed with the correct
polarity. (➔ page 13)
Install new batteries. Don’t mix different types of batteries,
or old and new batteries. (➔ page 13)
Make sure that the remote controller is not too far away
from the AV receiver, and that there’s no obstruction
between the remote controller and the AV receiver’s
remote control sensor. (➔ page 13)
Make sure that the AV receiver is not subjected to direct
sunshine or inverter-type fluorescent lights. Relocate if
necessary.
If the AV receiver is installed in a rack or cabinet with
colored-glass doors, the remote controller may not work
reliably when the doors are closed.
Make sure you’ve selected the correct remote controller
mode. (➔ pages 12, 89)
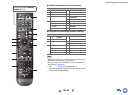
When using the remote controller to control other
manufacturers’ AV components, some buttons may not
work as expected.
Make sure you’ve entered the correct remote control code.
(➔ page 87)
Make sure to set the same ID on both the AV receiver and
remote controller. (➔ page 82)
If it’s an Onkyo component, make sure that the cable
and analog audio cable are connected properly.
Connecting only an cable won’t be enough.
(➔ page 24)
Make sure you’ve selected the correct remote controller
mode. (➔ pages 12, 89)
If you’ve connected an cassette tape deck to the TV/CD IN
jack, or an RI Dock to the TV/CD IN or GAME 1 IN jacks,
for the remote controller to work properly, you must set the
input display appropriately. (➔ page 54)
If you cannot operate it, you will need to enter the
appropriate remote control code. (➔ page 87)
To control another manufacturer’s component, point the
remote controller at that component. (➔ page 87)
To control an Onkyo component that’s connected via ,
point the remote controller at the AV receiver. Be sure to
enter the appropriate remote control code first.
(➔ page 88)