


Appendix C Lexicon
C-12
the remote control is no longer in Setup mode. If this occurs, you will
need to repeat this step to re-enter the Setup mode.
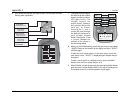
3. Touch the PUNCH option to setup the system volume control. The
menu name changes to “PUNCH” and the bottom of the screen
flashes “SELECT BUTTON”. A new screen now displays with the
options: VOL, PLAY, CH, and VOD.
4. Touch the VOL (Volume) option. The menu name changes to
“VOL” and the component options are displayed. The VOL option
sets up the group of three buttons - Volume Up, Volume Down,
and Mute - all in one action.
The bottom of the touch screen flashes “PUNCH TO”. Touch
the option for the component that doesn’t have volume control
commands yet (like the DVD). This is the component you are
going to PUNCH TO for the volume and mute commands.
Note: If you want to PUNCH TO the MAIN component, press the
POWER OFF button at this time.
5. The bottom of the display will then flash “PUNCH FROM”. Now
select the MAIN component that has the volume commands that
you want to use (for example, “LEX” for the RV-5 Receiver). The
bottom of the touch screen flashes “SAVED”.
6. Repeats Steps 4 & 5 to add all of the components that you’d like
to control through the system volume control.
7. When finished, exit the Setup mode by pressing the MAIN button
until the touch screen displays MAIN in the menu heading area.
The remote control is in normal operation mode again.
The Punch Through feature is NOT limited to volume and can also be
applied to channel selection and other functions. If you find yourself
switching to a particular component frequently to use a group of
controls, consider using Punch Through for another group. The
available punch through features, and the controls that the punch
through operates, are:
• VOL - Volume Up, Volume Down, and Mute
• CH - Channel Up, Channel Down, Previous Channel, and
Channel (0 to 9 Number Keypad) buttons
• PLAY - Play, Stop, Pause, Rewind, and Fast Forward
• VOD - Guide, Menu, Info, Exit, Up, Down, Left, Right, and
Select
To set any of the other punch through features, perform the Steps for
the System Volume control, but in Step 4, touch the desired alternate
control option (CH, PLAY, or VOD).
Hiding and Adding Pages:
Each of the component touch screen menus actually contains five
pages. However, in most cases, only two to four pages are visible in the
factory default settings; the rest of the menu pages are hidden. If you
wish to use the hidden pages, you can ADD them. If you don’t want to
use some of the existing pages, you can HIDE them. Follow the
instructions below to add or hide pages in both the component and
favorite menus.
1. On the remote control, press and hold the MAIN and ENT (Enter)
buttons at the same time. After about 3 seconds, “SETUP” is
displayed in the Menu name area at the top of the LCD touch
screen. This is the Setup mode of the remote control.
NOTE: You now have 30 seconds to perform the next step while the
remote is in the Setup mode. If a button is not pressed within 30
seconds, the SETUP menu name will revert to MAIN, indicating that
the remote control is no longer in Setup mode. If this occurs, you will
need to repeat this step to re-enter the Setup mode.
2. Touch the EDIT option to add and hide touch screen menu pages.
The menu name changes to “EDIT” and the bottom of the screen
flashes “SELECT BUTTON”.
A new screen now displays with the options: TEXT, PAGE, and
EXIT. Touching the EXIT option will leave the menu without
saving any changes.