


Basic Operation Lexicon
2-10
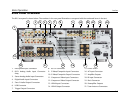
RV-5 MENU OVERVIEW
When the remote control touch screen is in the
“LEX”, “TUNER”, or “ZONE 2” menu layers,
pressing MENU or SELECT on the RV-5 remote
control accesses the menu controls for the RV-5
Receiver. The MAIN MENU is the root directory
of the RV-5 menu structure and has three branches: AUDIO
CONTROLS, VIDEO STATUS, and SETUP.
Note: The DVD menu layer of the touch screen controls the Lexicon RT-20
and RT-10, if installed.
The AUDIO CONTROLS menu controls the audio-specific parameters,
such as treble and bass, as well as providing an audio status menu.
Refer to Section 4: Audio Controls & Video Status for more
information.
The VIDEO STATUS menu is an information-only menu identifying
the current video status of the RV-5 Receiver. For more information,
refer to Section 4: Audio Controls & Video Status.
The SETUP menu controls all aspects of setting up the RV-5 Receiver.
Refer to Section 3: Setup for more information.
The RV-5 menu structure can be viewed on the OSD (On-Screen
Display), which is a 480i or 480p video output signal to your monitor,
or on the front panel 2-line display, which displays the menus one line
at a time using the remote control navigation controls. The front panel
2-line display can also be viewed on the OSD, in 480i resolution only.
Note: When the RV-5 menu structure is entered, most front panel buttons
and the remote control buttons are disabled until the menu structure is
exited. The exceptions are the Volume Knob and Standby Button on the
front panel and the remote control Volume, Mute, and OFF buttons. Note
also that the disabled condition of the remote control only affects the
“LEX”, “TUNER”, and “ZONE 2” menu layers.
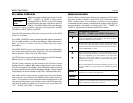
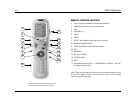
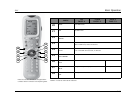
MENU NAVIGATION
Use the remote control arrow buttons to navigate the RV-5 menu
structure, shown in detail in Appendix B. The Command Matrix
Table, located later in this chapter, indicates the navigation
commands that the remote control buttons perform when the RV-5
command bank is activated by selecting the “LEX”, “TUNER”, or
“ZONE 2” options on the remote control touch screen.
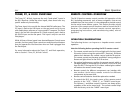
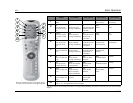
MAIN MENU
AUDIO CONTROLS
VIDEO STATUS
SETUP
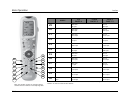
Arrow
Navigation Functions
(for “LEX”, “TUNER”, and “ZONE2” menu layers)
When a menu is open, press the remote control arrow to
select the highlighted menu parameter. The menu parameter
will blink to indicate that it is selected.
When a menu is open, press the arrow to close the menu and,
in most cases, open the previous menu. Subsequent presses
continue to close the current menu and open the previous menu
until the MAIN MENU is closed.
When a menu is open, press the and arrow buttons to scroll
upward and downward through the complete list of menu param-
eters. The highlighted menu item appears in the front panel
display. All menu items appear in the OSD. The cursor
automatically wraps to the next menu parameter when the first or
last menu item is passed.
When a menu parameter is selected and blinking, press the and
arrow buttons to scroll through the available parameter
options.
SELECT
Press the SELECT button to open the menu structure, open a
menu branch, or select a menu parameter.
MENU
Press the MENU button to open the menu structure.
EXIT
When the menu is open, press the EXIT button to leave the menu.
Unlike the arrow button which closes a menu layer, the EXIT
button completely closes the menu structure.