


RV-5 Tuner, PC, & Dock Controls
5-7
To remove the factory installed
insert, hold the Dock with one
hand as you grab the edges of
the insert in the Dock with
your other hand, then pull
straight up. Use the following
as a guide to determine which
insert is correct for your iPod model:
• For any iPod with a color screen, including all iPod photo
models, use the insert with “COLOR/PHOTO” on the back.
This insert is already installed in the Dock at the factory.
• For 20GB or 30GB iPod photo models only, remove the insert
marked “COLOR/PHOTO” and attach the two included foam
pads to the rear inside wall in the well of the insert before
replacing it.
• For iPods with a black & white screen and a 10GB, 15GB, or
20GB hard drive, use the insert with “10GB/15GB” on the
back.
• For iPods with a black & white screen and a 30GB or 40GB
hard drive, use the insert with “30GB/40GB” on the back.
• Use the insert with “mini” on the back for all iPod mini models.
• Use the insert with “Universal” on the back for iPod models
that come with a special insert.
Once you have selected the correct insert, place it over the well in
the center of the Dock and gently press it down so that it snaps into
place.
Note: Do not place an iPod in the Dock unless an insert is installed;
otherwise the iPod will not connect properly and damage may occur to the
Dock and/or your iPod that is not covered by the warranty for either
product.
DOCKING THE iPOD
After placing the appropriate insert in the
center well of the Dock and connecting
the Dock to your receiver, dock your iPod
by placing it into the insert, gently
pressing it down until the connectors
mate between the iPod and the Dock.
Note: If you normally keep your iPod in a
protective case, or “skin”, you will need to
remove it before docking your iPod.
When the iPod is plugged into the Dock, the iPod navigation
controls are no longer accessible and the iPod screen will read
“Connected and ready to be unplugged“.
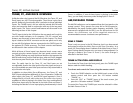
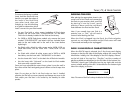
DOCK 2-LINE DISPLAY CHARACTERISTICS
When the DOCK input is selected, the 2-line front panel display
changes so that the left side of the display reflects the current iPod
information. Initially, the 2-line display on the RV-5 displays “Menu”
on the left side of the top line. “Playlists” and the number of
playlists available are displayed on the left side of the bottom line.
The ANLG signal type is identified on the top right side and the
current volume setting of the RV-5 is identified on the bottom right
side of the display, as shown:
Note: The name of the iPod is always included as the first playlist.
MENU
PLAYLISTS 11
ANLG
-39dB