


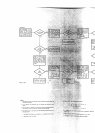


O
HOLD,
ith
@p€
Conned
A1c.207.
l0 from
h€ orher.
Trouble.hoor
FET
sitchB
A10204,
205,
2G,
and
209 by m€suring
gate-tosur@
voltages,
with
Sample
Rate
set to
HOLD.
Volbg6
3hould
be:
o2or
0 v
0205
-5
V
0208
0 v
ozx,
ov
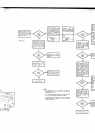
Perfo.m
DC
Zero
Adjust-
runta,
Parag6ph 555,
after repair.
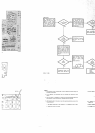
AlAl
TPA. Repla@
A1U2O2
in ocks.
Wirh
Sample Rae
in HOLD,
monitor
AiAITPA
with
sp€.
(41C207
shortedl
Adju$
AlAl R210
extrere
to the
othor.
TPA
should
6ry
-
0.6 V
{fully
dl b
+
0.6 V
(fully
cil).
Db@nnet
-5V
lrom
A'lA1TPA
and @nned
TPA to Ground,
Remve
41U2O1. Conned
dc null
wltmter b*wen
eur@ of
41O206A
and
surce of
AIO2OOB. Volt-
age should
be 0
t
40 mV.
lf
y6,
adjus
AlAl R210
for
bltage
at
n@f zslo
as
posible.
M€aure
gate-to-
source voltage
of
AlOZ)GA end
B. Gate
shoold b€ approx.
-1.5V
with
rspoct
to
$wce.
Remove
A1U2O2
from
ocket.
Connect
AITP| to
Ground.
Conn@t dc
null
ffier
betreen sure of
A1O2O7A.nd sure of
A1O2O7B.
Volbge ihould
be O
t
l0 mV.
lf
y6,
adiüs AlAt R210 for
rclbgp aa n€r z€ro
as
rcsible.
M6sure
gate-b-
source voltage
of
A1O2OTA and
g.
Gate
should b€ approx.
-
1.5 V
with r6rd
to sure.
Repla@
AlU2O2
with ns
p6rt
and
pefform
Dc zerc
Adiusmnts,
Parag6ph
Redae
A1O2O7 and
per-
torm
DC Zero
Adiusrcnß, ParagEph
5€s.
Replee
AlU20l with
new
part
and
pertorm
DC Zero
Adiu*tunts,
Pe.
565,
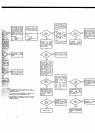
F Eint
. i0
v
Connet
dc null mt6
bdwen
A'ITPR and
Grourd. Volbge
should
be
0r30mV.
tl/leere 6lbge
at
+
Ref
Bt
Fint
on A2
with
+digit DVM.
Should be
+
t0 v
t
m.oo30 v.
Diiconnsct
B@ffi6o
iump€r
on A2.
Conned
led
from
A1TPR to
6
oI
A2O1
(O1A
s.te).
Conned anothff
dip le6d
trom
pin
3
of
A2Ol
(OtA
to
Ground. Measure
berw@n
A1 TPR
and
g.ound
with dc
null
Mer.
Should be
0 1
30 mV.
Adiust
AlR522 from
om
extreme
to
the other. Volt-
a!ß at
AITPR
rholld 6ry
approximately
from
+
30,mV
b
-
g)
mV.
asritly. Sa Pa.agEph
?-14.
Al$ se PaEgraph
7-16.
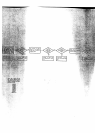
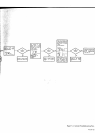
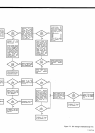
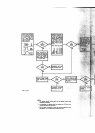
Troubletr@t
-
Ret
ilnffi-
ing
Ampl Figre 7-22.
Troublerhoot DC
Ampli.
tier.
S€e
Paragraph
7-16.
Tror6le*r@t
+
Ret
Sutr
ply.
FigureT-22.
Se PaE"
gtzpl\
7
-24.
Troubleshoot
DC Amdi-
tift.
Sa
PaEgräph
7-l
6.
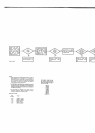
Figure
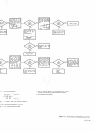
7-5.
DC Analog
Troubleshooting
Tree.
7-r317-14