DL-V3 User Manual Rev 3 179
switch in between them.
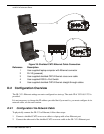
Figure 39: Sheilded CAT5 Ethernet Cable Connection
Reference Description
1 User-supplied laptop computer with Ethernet connector
2 DL-V3 (powered)
3 User-supplied sheilded CAT5 Ethernet cross-over cable
4 User-supplied DSS-5+ Port Switch
5 User-supplied sheilded CAT5 Ethernet straight-through cables
D.2 Configuration Overview
The DL-V3’s Ethernet settings are auto-configured on start-up. The static IP of 192.168.1.223 is
provided.
It is not necessary to change the IP address provided but if you need to, you must configure it via
network cable, see the next section.
D.2.1 Configuration Via Network Cable
To physically connect the DL-V3 to Ethernet, follow these steps:
1. Connect a sheilded CAT5 cross-over cable to a laptop with a free Ethernet port
2. Connect the other end of the sheilded CAT5 crossover cable to the DL-V3’s Ethernet port
1
2
1
2
3
4
5
5


